
10 steps to building Terragrunt orchestrator
- Sample Architecture
- Understanding the Terragrunt Folder Structure
- Terraform modules used to build this solution
- Step 1. Single terragrunt.hcl configuration to deploy one module
- Step 2. Add a provider configuration
- Step 3. Multiple simple modules
- Step 4. Add a root configuration
- Step 5. Add a region level to the configuration
- Step 6. Create remote state and locking resources automatically
- Step 7. Configure dependencies between modules
- Step 8. Cross-region dependencies
- Step 9. Account level with cross-account dependencies
- Step 10. Set a proper profile per account
- Bonus Step. Run-all commands
- Bonus Step. Tips and tricks
If you’re a DevOps engineer or working in infrastructure automation, you might’ve heard of Terragrunt, an open-source infrastructure management tool that provides an easy-to-use interface on top of Terraform.
Terragrunt is used to manage multiple Terraform modules across different environments, providing a consistent and reliable way to deploy infrastructure. It simplifies the configuration process by using a DRY (Don't Repeat Yourself) approach, which eliminates redundancy and allows you to define reusable code.
This blog post presents a comprehensive guide on constructing a Terragrunt orchestrator, useful for managing and deploying Terraform modules across multiple regions and accounts.
Now, let's delve in and explore how Terragrunt can be utilised to streamline infrastructure management tasks.
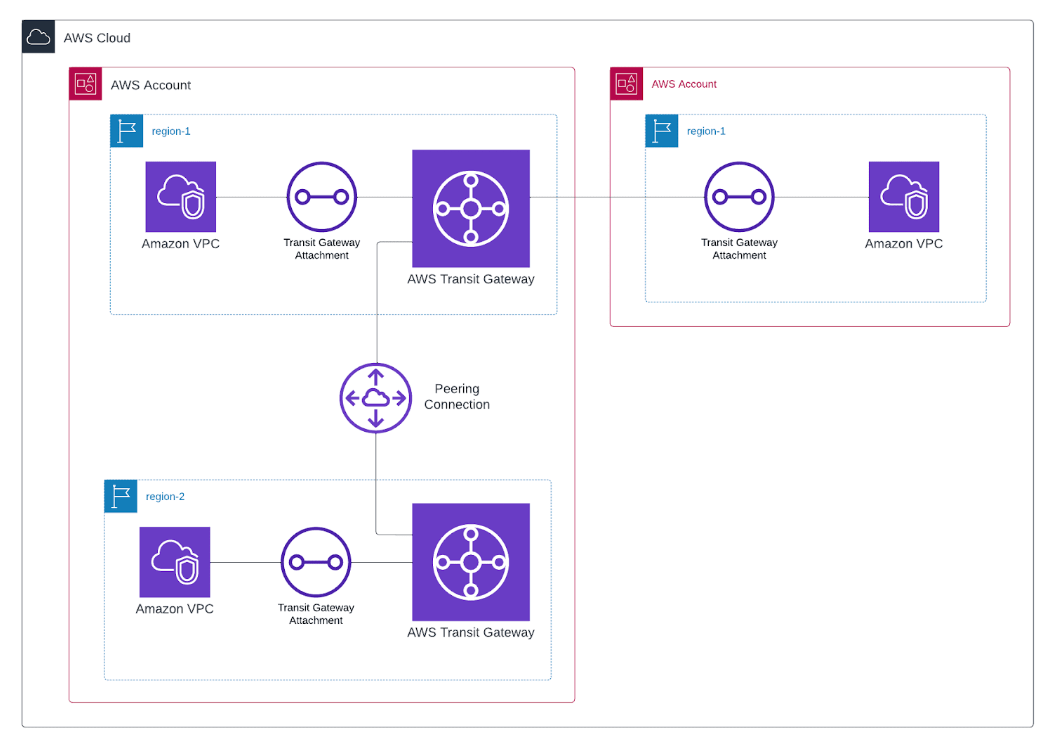
Sample Architecture
This architecture is designed to illustrate the construction of an Orchestrator for Terraform modules. It aims to achieve a multi-level structure with cross-region and cross-account dependencies.
Understanding the Terragrunt Folder Structure
This post will guide you on creating a complex Terragrunt configuration. It's going to be for an example setup that includes working across different regions and accounts.
It's important to know how Terragrunt's folder setup works when you're making a Terragrunt orchestrator. This knowledge helps any cloud engineer build a setup that fits what their project or app needs. Up next, the focus will be on how this setup comes together.
Here's the final structure that will be built starting from scratch.
.
├── aws-account-1
│   ├── eu-central-1
│   │   ├── tgw
│   │   │   └── terragrunt.hcl
│   │   ├── tgw_peering_accepter
│   │   │   └── terragrunt.hcl
│   │   ├── vpc
│   │   │   └── terragrunt.hcl
│   │   └── region.hcl
│   ├── eu-west-1
│   │   ├── tgw
│   │   │   └── terragrunt.hcl
│   │   ├── tgw_peering_attachment
│   │   │   └── terragrunt.hcl
│   │   ├── vpc
│   │   │   └── terragrunt.hcl
│   │   └── region.hcl
│   └── account.hcl
├── aws-account-2
│   ├── eu-central-1
│   │   ├── vpc
│   │   │   └── terragrunt.hcl
│   │   ├── vpc_attachment
│   │   │   └── terragrunt.hcl
│   │   └── region.hcl
│   └── account.hcl
└── root.hcl
Terraform modules used to build this solution
- AWS VPC Terraform module
- AWS Transit Gateway Terraform module
- Local module for TGW peering attachment
- Local module for TGW peering accepter
Check out the fantastic collection of reusable Terraform modules on the terraform-aws-modules GitHub page! These modules provide a great starting point for building your infrastructure, saving you time and effort. With support for a wide range of AWS services and architectures, you're sure to find what you need to get started with Terraform and Terragrunt.
Step 1. Single terragrunt.hcl configuration to deploy one module
File structure will be created in this step:
.
└── terragrunt.hcl
This step involves creating a basic Terragrunt configuration to deploy a single Terraform module. There won't be any specific structure at this stage, instead, an external Terraform module terraform-aws-modules/vpc/aws will be used.
This part provides a basic understanding of how Terragrunt works and how to use it to deploy a Terraform module.
The following configuration is deploying the VPC in eu-central-1 region, with the specified name, CIDR block, availability zones, and private subnets.
# terragrunt.hcl

terraform {
  source = "tfr:///terraform-aws-modules/vpc/aws?version=5.0.0"
}

inputs = {
  name            = "vpc-eu-central-1"
  cidr            = "10.0.0.0/16"
  azs             = ["eu-central-1a", "eu-central-1b"]
  private_subnets = ["10.0.1.0/24", "10.0.2.0/24"]
}
In order to deploy this, navigate to the directory containing this terragrunt.hcl file and run terragrunt apply. Terragrunt will download the module, input the variables, and deploy the infrastructure.
Without provider configuration, the terragrunt.hcl will deploy to the AWS account associated with the default profile in your AWS credentials file.
The upcoming step will explicitly outline the provider configuration. This will identify which AWS profile should be deployed.
Step 2. Add a provider configuration
File structure will be created in this step:
.
└── terragrunt.hcl
Still working with a single file, the intention now is to add a specific region and profile, rather than utilising default values.
The generate block can be used to create a file with provider configuration.
# terragrunt.hcl

generate "provider" {
  path      = "_provider.tf"
  if_exists = "overwrite_terragrunt"
  contents  = <<EOF
provider "aws" {
  region  = "eu-central-1"
  profile = "network-account-profile"
}
EOF
}

terraform {
  source = "tfr:///terraform-aws-modules/vpc/aws?version=5.0.0"
}

inputs = {
  name            = "vpc-eu-central-1"
  cidr            = "10.0.0.0/16"
  azs             = ["eu-central-1a", "eu-central-1b"]
  private_subnets = ["10.0.1.0/24", "10.0.2.0/24"]
}
In this example, the generate block is creating a file named _provider.tf with a pre-defined AWS provider configuration. The path attribute specifies the location of the generated file, and the if_exists attribute tells Terragrunt what to do if the file already exists; in this case, Terragrunt will overwrite the file. The contents attribute specifies the contents of the file, which in this case is the AWS provider block.
At this stage, region and profile values are hardcoded into the configuration for clearness and simplicity. Future steps will address and enhance this approach.
Important. Please reference to the official Terragrunt documentation with recommended way to work with multiple accounts:
Work with multiple AWS accounts
<aside> 👉 Note: If you use SSO credentials you might encounter issues using profiles. As of June 2023, theres is an open issue in the hashicorp/terraform-provider-aws repository. The workaround is to create a profile without the sso_session parameter. In subsequent steps, you will find how to configure Terragrunt to automatically run export AWS_PROFILE=profile.
Step 3. Multiple simple modules
File structure will be created in this step:
.
├── tgw
│   └── terragrunt.hcl
└── vpc
    └── terragrunt.hcl
This step introduces another module for creating a Transit Gateway resource. Simply take the existing terragrunt.hcl file, make a copy, and then modify the module source and inputs.
This time, it's important to create a separate folder for each module, maintaining the one-to-one mapping between a Terraform module and a terragrunt.hcl file.
The code below utilises an external module to deploy the Transit Gateway.
Up to this point, no relations or dependencies exist between modules.
# ./tgw/terragrunt.hcl

generate "provider" {
  path      = "_provider.tf"
  if_exists = "overwrite_terragrunt"
  contents  = <<EOF
  provider "aws" {
    region = "eu-central-1"
    profile = "network-account-profile"
  }
  EOF
}

terraform {
  source = "tfr:///terraform-aws-modules/transit-gateway/aws?version=2.10.0"
}

inputs = {
  name            = "tgw-eu-central-1"
  description     = "My Transit Gateway"
}
# ./vpc/terragrunt.hcl
generate "provider" {
path = "_provider.tf"
if_exists = "overwrite_terragrunt"
contents = <<EOF
provider "aws" {
region = "eu-central-1"
profile = "network-account-profile"
}
EOF
}
terraform {
source = "tfr:///terraform-aws-modules/vpc/aws?version=5.0.0"
}
inputs = {
name = "vpc-eu-central-1"
cidr = "10.0.0.0/16"
azs = ["eu-central-1a", "eu-central-1b"]
private_subnets = ["10.0.1.0/24", "10.0.2.0/24"]
}Notice the identical generate block present in both terragrunt.hcl files. Terragrunt offers a solution to avoid such duplications.
In the next step, the provider block moves to the root configuration and gets included in the terragrunt.hcl files.
Step 4. Add a root configuration
File structure will be created in this step:
.
├── tgw
│   └── terragrunt.hcl
├── vpc
│   └── terragrunt.hcl
└── root.hcl
The include block allows the specification of one or more parent configurations, merging them with the module configuration.
For this scenario, a root.hcl file containing the provider configuration gets created, which is then included with every module. As work progresses, this root file will expand with more centralised configuration and variables that other modules can reuse.
# ./root.hcl

generate "provider" {
  path      = "_provider.tf"
  if_exists = "overwrite_terragrunt"
  contents  = <<EOF
  provider "aws" {
    region = "eu-central-1"
    profile = "network-account-profile"
  }
  EOF
}
With only a few of modules deployed to the same account and region, the present configuration functions well. However, the goal here is to build an infrastructure spanning multiple regions and accounts. As a result, there's a need to specify the profile and region per module. This challenge will be solved in the next step by region level implementation.
Now, the provider configuration can be removed from the child configuration and replaced by include block.
# ./vpc/terragrunt.hcl

include "root" {
  path   = find_in_parent_folders("root.hcl")
  expose = true
}

terraform {
  source = "tfr:///terraform-aws-modules/vpc/aws?version=5.0.0"
}

inputs = {
  name            = "vpc-eu-central-1"
  cidr            = "10.0.0.0/16"
  azs             = ["eu-central-1a", "eu-central-1b"]
  private_subnets = ["10.0.1.0/24", "10.0.2.0/24"]
}
An attribute called expose can be noticed in the include block. This feature allows parsing and presenting the included configuration as a variable. It proves to be useful when there's a need to utilise some variables from the root config. In this case you can have an access to locals like include.root.locals.var_name
include "root" {
  path   = find_in_parent_folders("root.hcl")
  expose = true
}

terraform {
  source = "tfr:///terraform-aws-modules/vpc/aws?version=5.0.0"
}

inputs = {
  name            = "vpc-eu-central-1"
  cidr            = "10.0.0.0/16"
  azs             = ["eu-central-1a", "eu-central-1b"]
  private_subnets = ["10.0.1.0/24", "10.0.2.0/24"]

  **tags = include.root.locals.common_tags**
}
Step 5. Add a region level to the configuration
File structure will be created in this step:
.
├── eu-central-1
│   ├── tgw
│   │   └── terragrunt.hcl
│   ├── vpc
│   │   └── terragrunt.hcl
│   └── region.hcl
└── root.hcl
The current root configuration contains a hardcoded region value. The aim with a new region structure is to specify the region value based on the folder in which the module is located. This approach assists in deploying modules across multiple regions while maintaining one centralised configuration.
.
├── eu-central-1
│   ├── tgw
│   │   └── terragrunt.hcl
│   ├── vpc
│   │   └── terragrunt.hcl
│   └── region.hcl
*├── eu-west-1
│   ├── tgw
│   │   └── terragrunt.hcl
│   ├── vpc
│   │   └── terragrunt.hcl
│   └── region.hcl
├── us-west-1
│   ├── tgw
│   │   └── terragrunt.hcl
│   ├── vpc
│   │   └── terragrunt.hcl
│   └── region.hcl*
└── root.hcl
The idea of this structure is to have region-specific configuration inside every region-folder.
# ./eu-central-1/region.hcl

locals {
  aws_region = "eu-central-1"
}
The challenge at this stage is determining how to pass this value to the root configuration. This is where the utility of read_terragrunt_config becomes useful. It assists in loading additional context into the parent configuration by utilising the folder structure. To achieve this, the root configuration is modified to introduce region_vars. Remember, find_in_parent_folders operates within the context of the child configuration, hence the search for region.hcl within the parent folders.
# ./root.hcl

locals {
  region_vars = read_terragrunt_config(find_in_parent_folders("region.hcl"))
  aws_region  = local.region_vars.locals.aws_region
}

generate "provider" {
  path      = "_provider.tf"
  if_exists = "overwrite_terragrunt"
  contents  = <<EOF
  provider "aws" {
    region = "${local.aws_region}"
    profile = "network-account-profile"
  }
  EOF
}
You can use more region-specific variables, but in our case we only need aws_region.
Understanding the concept presented in this step is vital. Applying this approach, you can architect structures that span across multiple accounts, stages, or any other customisable factor you can name. When you combine this with the include block, you can group various modules together, enabling the development of complex architectures. This approach fully leverages the flexibility offered by Terragrunt.
Refer to the official Terragrunt documentation for a detailed explanation of these concepts.
Keep your Terragrunt Architecture DRY
Step 6. Create remote state and locking resources automatically
In the previous steps a backend for the Terraform state wasn't defined. By default, this leads to the creation of a local state file. This might suffice for small projects or testing scenarios, but can be limiting and risky in a team environment or production. Therefore, configuring remote state storage becomes critical for substantial projects.
In an extensive infrastructure setup with distinct modules managing different parts, each module needs a backend to manage its state. Without Terragrunt, the standard Terraform setup would require repeating the remote state configuration in each module, which can lead to inconsistencies.
Terragrunt follows DRY principle by allowing remote state configuration to be defined once and reused across multiple Terraform modules.
With integrated remote_state into configuration, Terragrunt automatically creates next resources if they don’t already exist:
- S3 bucket for remote state storage with server-side encryption, versioning and access logging enabled
- DynamoDB table for locking with server-side encryption.
remote_state {
  backend = "s3"
  config = {
    encrypt        = true
    bucket         = "terraform-state-your-unique-prefix-${local.aws_region}"
    key            = "${path_relative_to_include()}/terraform.tfstate"
    region         = local.aws_region
    dynamodb_table = "terraform-locks"
    profile        = "network-account-profile"
  }
  generate = {
    path      = "_backend.tf"
    if_exists = "overwrite_terragrunt"
  }
}
With built-in function path_relative_to_include() you can be sure that state file for every child module will be stored in a different folder of S3 bucket.
Step 7. Configure dependencies between modules
File structure will be created in this step:
.
├── eu-central-1
│   ├── tgw
│   │   └── terragrunt.hcl
│   ├── vpc
│   │   └── terragrunt.hcl
│   └── region.hcl
└── root.hcl
This step involves adding a VPC attachment to the Transit Gateway. The Terraform module in use allows the specification of VPC attachments as an input variable.
vpc_attachments = {
    vpc1 = {
      vpc_id       = var.vpc_id
      subnet_ids   = var.private_subnets
      dns_support  = true

      transit_gateway_default_route_table_association = true
      transit_gateway_default_route_table_propagation = true
    },
  }
In this case, it is necessary to define vpc_id and private_subnets variables. These values can be obtained from the outputs of the VPC module.
You can find the full list of available outputs for the terraform-aws-vpc module on the Terraform Registry site or Github repo.
terraform-aws-vpc/outputs.tf at master · terraform-aws-modules/terraform-aws-vpc
To access output variables from another module in the inputs attribute of Terragrunt, use the dependency block.
Here is how our terragrunnt.hcl looks for the tgw module, which has dependencies on the vpc module.
# ./eu-central-1/tgw/terragrunt.hcl

include "root" {
  path   = find_in_parent_folders("root.hcl")
  expose = true
}

dependency "vpc" {
  config_path = "../vpc"
}

terraform {
  source = "tfr:///terraform-aws-modules/transit-gateway/aws?version=2.10.0"
}

inputs = {
  name            = "tgw-eu-central-1"
  description     = "My Transit Gateway"

  vpc_attachments = {
    vpc1 = {
      vpc_id       = dependency.vpc.outputs.vpc_id
      subnet_ids   = dependency.vpc.outputs.private_subnets
      dns_support  = true

      transit_gateway_default_route_table_association = true
      transit_gateway_default_route_table_propagation = true
    },
  }
}
When executing terragrunt apply from the location of the tgw module, the command will fail with an error. Terragrunt will not deploy the configuration until all modules referenced in dependency blocks have been applied. This is due to the fact that outputs cannot be fetched from an unapplied Terraform module.
You should run terragrunt run-all apply command to deploy all dependencies and current module itself.
The run all command can be executed from any folder of your structure. However, to build a correct ordering, Terragrunt needs a dependencies block with a list of all dependencies of the current module.
To ensure correct ordering of module deployment during a terragrunt run-all apply, it's recommended to list all modules that the current module depends on (i.e., modules that need to be applied before the current module) in the dependencies block, even if they are also specified in dependency blocks.
# ./eu-central-1/tgw/terragrunt.hcl

include "root" {
  path   = find_in_parent_folders("root.hcl")
  expose = true
}

dependency "vpc" {
  config_path = "../vpc"
}

dependencies {
  paths = ["../vpc"]
}

terraform {
  source = "tfr:///terraform-aws-modules/transit-gateway/aws?version=2.10.0"
}

inputs = {
  name            = "tgw-eu-central-1"
  description     = "My Transit Gateway"

  vpc_attachments = {
    vpc1 = {
      vpc_id       = dependency.vpc.outputs.vpc_id
      subnet_ids   = dependency.vpc.outputs.private_subnets
      dns_support  = true

      transit_gateway_default_route_table_association = true
      transit_gateway_default_route_table_propagation = true
    },
  }
}
See more details about run-all command in the bonus step of this guide.
Step 8. Cross-region dependencies
File structure will be created in this step:
.
├── eu-central-1
│   ├── tgw
│   │   └── terragrunt.hcl
│   ├── tgw_peering_accepter
│   │   └── terragrunt.hcl
│   ├── vpc
│   │   └── terragrunt.hcl
│   └── region.hcl
├── eu-west-1
│   ├── tgw
│   │   └── terragrunt.hcl
│   ├── tgw_peering_attachment
│   │   └── terragrunt.hcl
│   ├── vpc
│   │   └── terragrunt.hcl
│   └── region.hcl
└── root.hcl
Implementing the peering between Transit Gateways will be a good demonstration of cross-region dependencies.In this case, the same resources (VPC and TGW) need to be created in another region. This can be achieved by duplicating an entire region folder.
Once the copy-paste is done, the following actions should be taken:
- rename region folder
- change region to a proper one in the
eu-west-1/region.hclfile - edit inputs in
eu-west-1/tgw/terragrunt.hcl - edit inpust in
eu-west-1/vpc/terragrunt.hcl
You can find a completed example in the repo: <link>
The external module terraform-aws-modules/transit-gateway ****does not provide support for creating a peering connection between TGWs. Therefore, it is necessary to create a local solution.
To establish the peering connection, two resources are required:
aws_ec2_transit_gateway_peering_attachmentin the eu-west-1 region.aws_ec2_transit_gateway_peering_attachment_accepterin the eu-central-1 region.
These components will be implemented as two separate Terraform modules.
TF Module 1: Transit Gateway Peering Attachment
# main.tf

resource "aws_ec2_transit_gateway_peering_attachment" "this" {
  peer_account_id         = var.peer_account_id
  peer_region             = var.peer_region
  peer_transit_gateway_id = var.peer_transit_gateway_id
  transit_gateway_id      = var.transit_gateway_id
}

# outputs.tf

output "attachment_id" {
  value = aws_ec2_transit_gateway_peering_attachment.this.id
}

# variables.tf

variable "peer_account_id" {
  description = "(Optional) Account ID of EC2 Transit Gateway to peer with. Defaults to the account ID the AWS provider is currently connected to."
  type        = string
  default     = null
}

variable "peer_region" {
  description = "Region of EC2 Transit Gateway to peer with."
  type        = string
}

variable "peer_transit_gateway_id" {
  description = "Identifier of EC2 Transit Gateway to peer with."
  type        = string
}

variable "transit_gateway_id" {
  description = "Identifier of EC2 Transit Gateway."
  type        = string
}

# versions.tf

terraform {
  required_version = "~> 1.4.0"

  required_providers {
    aws = {
      source  = "hashicorp/aws"
      version = ">= 5.0"
    }
  }
}
TF Module 2: Transit Gateway Peering Accepter
# main.tf

resource "aws_ec2_transit_gateway_peering_attachment_accepter" "this" {
  transit_gateway_attachment_id = var.transit_gateway_attachment_id
}

# variables.tf

variable "transit_gateway_attachment_id" {
  description = "The ID of the EC2 Transit Gateway Peering Attachment to manage."
  type        = string
}

# versions.tf

terraform {
  required_version = "~> 1.4.0"

  required_providers {
    aws = {
      source  = "hashicorp/aws"
      version = ">= 5.0"
    }
  }
}
Two modules are necessary because they need to be placed in different regions.
To configure this, you can add a Terragrunt configuration with the needed inputs and dependencies.
# ./eu-west-1/tgw_peering_attachment/terragrunt.hcl

include "root" {
  path   = find_in_parent_folders("root.hcl")
  expose = true
}

terraform {
  source = "../../../../../modules/tgw_peering_attachment"
}

dependencies {
  paths = ["../tgw", "../../eu-central-1/tgw"]
}

dependency "tgw_west" {
  config_path = "../tgw"
}

dependency "tgw_central" {
  config_path = "../../eu-central-1/tgw"
}

inputs = {
  peer_region             = "eu-central-1"
  peer_transit_gateway_id = dependency.tgw_central.outputs.ec2_transit_gateway_id
  transit_gateway_id      = dependency.tgw_west.outputs.ec2_transit_gateway_id
}

# ./eu-central-1/tgw_peering_accepter/terragrunt.hcl

include "root" {
  path   = find_in_parent_folders("root.hcl")
  expose = true
}

terraform {
  source = "../../../../..//modules/tgw_peering_accepter"
}

dependencies {
  paths = ["../../eu-west-1/tgw_peering_attachment"]
}

dependency "attachment" {
  config_path = "../../eu-west-1/tgw_peering_attachment"
}

inputs = {
  transit_gateway_attachment_id = dependency.attachment.outputs.attachment_id
}
Step 9. Account level with cross-account dependencies
File structure will be created in this step:
.
├── aws-account-1
│   ├── eu-central-1
│   │   ├── tgw
│   │   │   └── terragrunt.hcl
│   │   ├── tgw_peering_accepter
│   │   │   └── terragrunt.hcl
│   │   ├── vpc
│   │   │   └── terragrunt.hcl
│   │   └── region.hcl
│   ├── eu-west-1
│   │   ├── tgw
│   │   │   └── terragrunt.hcl
│   │   ├── tgw_peering_attachment
│   │   │   └── terragrunt.hcl
│   │   ├── vpc
│   │   │   └── terragrunt.hcl
│   │   └── region.hcl
│   └── account.hcl
├── aws-account-2
│   ├── eu-central-1
│   │   ├── vpc
│   │   │   └── terragrunt.hcl
│   │   ├── vpc_attachment
│   │   │   └── terragrunt.hcl
│   │   └── region.hcl
│   └── account.hcl
└── root.hcl
Now it's time to integrate a third level to the structure. Following the same idea that was already described for the region level, you can group regions into account folders. Each account folder should contain an account.hcl file with account-specific variables.
# ./aws-account-1/account.hcl

locals {
  aws_profile    = "your-aws-account-1-profile"
  aws_account_id = "123456789012"
}
Finally, it is now possible to replace hardcoded profile values in the provider and backend configuration. With these improvements, you can deploy resources to multiple accounts with cross-account dependencies by executing the run-all apply command.
Take a look at the next step, which includes a final version of root.hcl for the current architecture.
The terraform-aws-modules/transit-gateway module supports creating attachments to a VPC in another account. It also creates all necessary Resource Access Manager (RAM) resources.
You should add a few parameters to the existing TGW, to share it with another account.
enable_auto_accept_shared_attachments = true

ram_allow_external_principals = true
ram_principals                = [123456789012]
Shared Transit Gateway configuration in the first account:
# ./aws-account-1/eu-central-1/tgw/terragrunt.hcl

include "root" {
  path   = find_in_parent_folders("root.hcl")
  expose = true
}

dependency "vpc" {
  config_path = "../vpc"
}

terraform {
  source = "tfr:///terraform-aws-modules/transit-gateway/aws?version=2.10.0"
}

inputs = {
  name            = "tgw-eu-central-1"
  description     = "My Transit Gateway"

  vpc_attachments = {
    vpc1 = {
      vpc_id       = dependency.vpc.outputs.vpc_id
      subnet_ids   = dependency.vpc.outputs.private_subnets
      dns_support  = true

      transit_gateway_default_route_table_association = true
      transit_gateway_default_route_table_propagation = true
    },
  }
}
And finally a VPC attachment in the second account:
# ./aws-account-2/eu-central-1/vpc_attachment/terragrunt.hcl

include "root" {
  path   = find_in_parent_folders("root.hcl")
  expose = true
}

terraform {
  source = "tfr:///terraform-aws-modules/transit-gateway/aws?version=2.10.0"
}

dependencies {
  paths = ["../vpc", "../../../aws-account-1/eu-central-1/tgw"]
}

dependency "vpc" {
  config_path = "../vpc"
}

dependency "tgw" {
  config_path = "../../../aws-account-1/eu-central-1/tgw"
}

inputs = {
  name = "tgw-vpc-attachment"

  create_tgw = false
  share_tgw  = false

  vpc_attachments = {
    vpc2 = {
      tgw_id       = dependency.tgw.outputs.ec2_transit_gateway_id
      vpc_id       = dependency.vpc.outputs.vpc_id
      subnet_ids   = dependency.vpc.outputs.private_subnets
      dns_support  = true

      transit_gateway_default_route_table_association = true
      transit_gateway_default_route_table_propagation = true
    }
  }
}
Step 10. Set a proper profile per account
As mentioned previously, the profile in the provider configuration may not always work as expected. To work around this issue, set AWS_PROFILE before executing Terraform commands.
You can configure Terragrunt to pass custom environment variables for specific commands by using an extra_arguments block in your Terragrunt configuration file.
terraform {
  extra_arguments "aws_profile" {
    commands = [
      "init",
      "apply",
      "refresh",
      "import",
      "plan",
      "taint",
      "untaint"
    ]

    env_vars = {
      AWS_PROFILE = "aws-profile-name"
    }
  }
}
With the above configuration, when you run terragrunt apply, Terragrunt will execute Terraform with the following command:
AWS_PROFILE=aws-profile-name terragrunt applyThe root.hcl file now contains all necessary configurations to use the proper region and profile values based on the folder structure.
# ./root.hcl

locals {
  region_vars = read_terragrunt_config(find_in_parent_folders("region.hcl"))
  account_vars = read_terragrunt_config(find_in_parent_folders("account.hcl"))

  aws_region     = local.region_vars.locals.aws_region
  aws_profile    = local.account_vars.locals.aws_profile
  aws_account_id = local.account_vars.locals.aws_account_id
}

generate "provider" {
  path      = "_provider.tf"
  if_exists = "overwrite_terragrunt"
  contents  = <<EOF
  provider "aws" {
    region = "${local.aws_region}"
  }
  EOF
}

remote_state {
  backend = "s3"
  config = {
    encrypt        = true
    bucket         = "terraform-state-${local.aws_account_id}-${local.aws_region}"
    key            = "${path_relative_to_include()}/terraform.tfstate"
    region         = local.aws_region
    dynamodb_table = "terraform-locks"
    profile        = local.aws_profile
  }
  generate = {
    path      = "_backend.tf"
    if_exists = "overwrite_terragrunt"
  }
}

terraform {
  extra_arguments "aws_profile" {
    commands = [
      "init",
      "apply",
      "refresh",
      "import",
      "plan",
      "taint",
      "untaint"
    ]

    env_vars = {
      AWS_PROFILE = "${local.aws_profile}"
    }
  }
}
Bonus Step. Run-all commands
The terragrunt run-all command is a powerful feature in Terragrunt that automates the process of running a specified command (like apply, plan, or destroy) across multiple Terraform modules. When executed, terragrunt run-all recursively navigates through each subdirectory of the current directory, detects the presence of a terragrunt.hcl file, and runs the specified command in each of these directories.
To maintain the correct order of operations based on module dependencies, terragrunt run-all uses the dependencies block present in terragrunt.hcl files. This block allows you to list other Terragrunt configurations that the current module depends on. During a run-all operation, Terragrunt constructs a dependency graph using this information and determines the correct order in which to apply, plan or destroy your modules. It ensures that each module is processed only after its dependencies have been successfully handled.
When it comes to terragrunt run-all plan and terragrunt run-all validate, it's important to note that they may fail if dependencies have not been applied yet. This is because plan and validate commands verify your Terraform code against the actual state of the resources in your cloud environment. If a module depends on outputs from another module that has not been applied yet, the plan or validate command for the dependent module may fail due to the missing outputs.
Bonus Step. Tips and tricks
Parallelism limits
By default, Terragrunt runs Terraform in parallel for each module it finds as it traverses the dependency graph. This means that if it finds 10 modules, it will run Terraform 10 times in parallel, once in each module. However, this can sometimes cause issues, such as hitting a rate limit on a cloud provider, especially when there are a lot of modules in the dependency graph.
To limit the maximum number of module executions at any given time, use the --terragrunt-parallelism [number] flag.
terragrunt run-all apply --terragrunt-parallelism 1Decrease warning and info messages in Terragrunt output
To make the output less verbose, you can configure the log level. Terragrunt provides a way to configure the logging level through the --terragrunt-log-level command flag.
terragrunt apply --terragrunt-log-level errorCreate aliases in your favorite shell
Some useful examples for zsh
alias tf='terraform'
alias tg='terragrunt'
alias tga='terragrunt run-all apply -auto-approve --terragrunt-parallelism 1 --terragrunt-log-level error'
Store aws provider in central place
By default, when you run terraform init, plugins are downloaded into a subdirectory of the working directory. This ensures that each working directory is self-contained. However, if you have multiple configurations that use the same provider, a separate copy of the provider's plugin will be downloaded for each configuration.
mkdir -p $HOME/.terraform.d/plugin-cache

echo 'plugin_cache_dir = "$HOME/.terraform.d/plugin-cache"' >  $HOME/.terraformrc
See official Terraform documentation for more details


Get in Touch.
Let’s discuss how we can help with your cloud journey. Our experts are standing by to talk about your migration, modernisation, development and skills challenges.
