
DNSSEC: Why we need it, how it works and how to implement it using AWS Route53
28 February 2024
About DNS
The Domain Name System (DNS) is often called "the backbone of the Internet". From a high level it’s a very simple concept - take a bunch of numbers which humans do not like and do not want to remember and translate them to words.
It’s when you go deeper down the rabbit hole to actually see how DNS works globally only do you realise how extremely complicated the system is. And how vulnerable it can be.
But before we talk about the DNSSEC feature, let’s recap how DNS actually works. I will make an assumption that you already have some knowledge of DNS and you are familiar with basic record types and terms like name server or resolver.
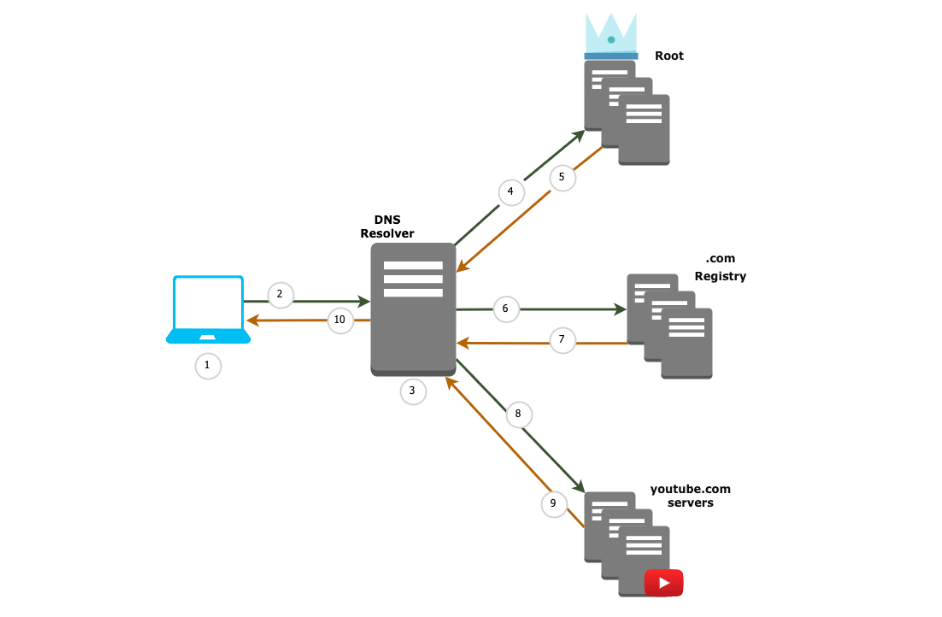
This will be a high-level overview of what happens when you click www.youtube.com link to watch that 15 seconds short video you don’t really want to, but your friend sent to you and you already marked their message as read.
- Your local computer checks its local cache & host file for www.youtube.com record
- Local computer queries resolver (could be your home router or ISP’s one)
- DNS resolver checks its local cache
- DNS resolver asks Root for www.youtube.com domain
- Root returns NS (Name Servers) for .com domain to resolver
- DNS resolver queries .com registry for www.youtube.com
- .com registry returns youtube.com NS
- Resolver asks youtube.com name servers for www.youtube.com
- Returns DNS A record for www.youtube.com
- Query is cached inside DNS resolver and returned to the original requester
This process is sometimes referred to as walking the tree. We are querying each domain level, starting at the top (root) and following the name servers which are returned at each level till we reach ones which contain the domain we requested.
The Internet is scary place
You may (and should) already know that, but the Internet is a very scary place. Every second of every day there are countless threats flying through it, throwing itself at every publicly exposed system and seeing what sticks.
And not to mention targeted and well-crafted attacks aimed to disrupt companies, governments, organisations and individuals in order to gain something from it (usually money or bragging rights). DNS as a backbone of the Internet is as vulnerable to those attacks as every other system that it enables and interconnects (if not even more). That’s where DNSSEC comes into play.
Why do we need DNSSEC
Because DNS by itself is not a secure solution. It was invented and developed in the 80s, when the Internet was a much smaller place and security was not a primary concern for its inventors and pioneers. As a result, there is no built-in way to verify the authenticity of the response we receive.
The only thing the resolver can check is that the response comes from the same IP address where it was sent - but it’s not very reassuring, is it? Responses like that can be easily spoofed and/or forged, redirecting us to places we didn’t intend to, and really don’t want to visit.
Imagine you are typing the URL of your bank, but instead of going to your bank’s official website, due to DNS-poisoning you are now trying to log in into its malicious clone website and bad actors are recording your every keystroke. That’s a problem if I ever saw one. (and that’s why you should always use MFA!)
DNSSEC was invented to tackle two biggest problems DNS had:
- Data origin authentication
- Data integrity protection
Data origin authentication allows resolver to cryptographically verify that data it received actually comes from the zone where data originated, whilst data integrity protection aims to ensure that data resolver receives was not tampered with and modified in transit since it began its journey in the owner zone.
So, how does it work?
“Complicated” would be the easy answer and we can call it a day. But since you are reading this I assume you would like to go into more detail, so let’s do it.
DNSSEC's main goal is to establish a chain of trust between DNS zone and records and it does so based on public key cryptography. However, DNS is not signing queries and responses themselves. Instead DNS data itself is cryptographically signed by the data owner.
DNSSEC within a zone
Firstly, let’s go through how DNSSEC works inside of the zone. This will achieve the data integrity portion of DNSSEC.
To begin with, we need to get familiar with the concept of RRset - Resource Records Set. To put it simply, RRset is the set of all Resource Records of a given record type for a given name. For example, domain nordcloud.com may have RRset of type A, as shown below.

You can see that all records have the same name and the same type. However, at this point, it is impossible for us to determine if these records are valid. DNSSEC will provide us with this functionality, albeit it is not individual records which are validated by DNSSEC, instead (you guessed it) - whole Resource Records Sets.
RRSIG records
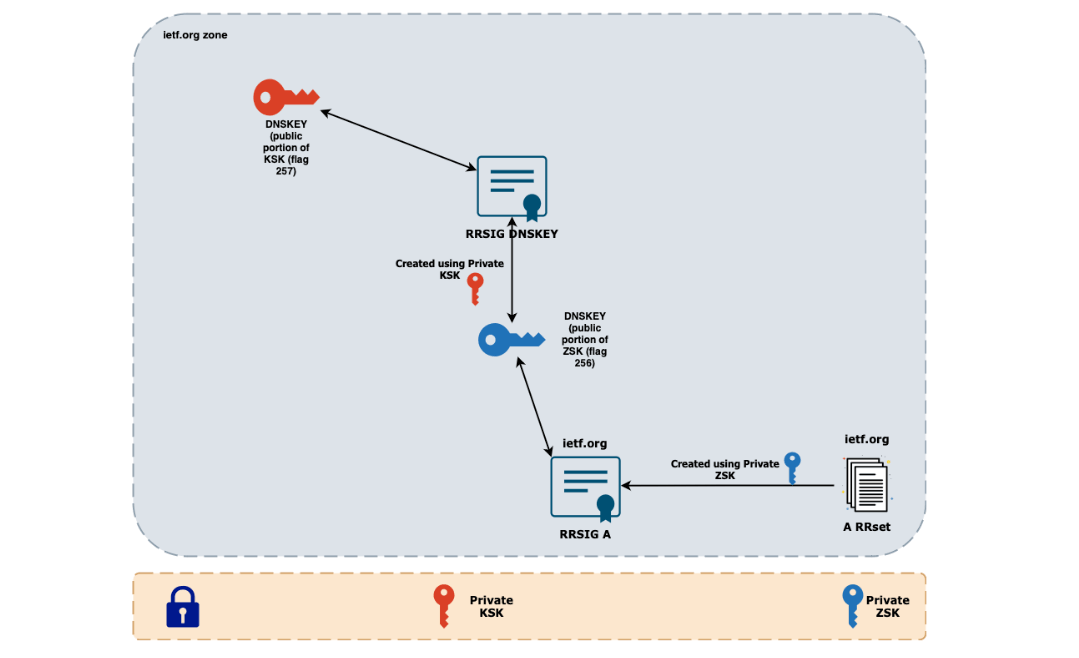
To do so, DNSSEC uses RRSIG - the record, which stores digital signature for a given record set (RRset) using private & public key pair. This pair is known as Zone Signing Key (ZSK).
Every zone publishes its public key, which then can be used by the resolver to validate data in that zone. Private key, as the name suggests, is being kept somewhere else, completely offline. The RRSIG record is created by taking RRset and signing it by the private part of ZSK.
This record then is stored alongside the RRset records. Every client which uses DNS will see the RRset in its original form. Any DNSSEC client will additionally see the corresponding RRSIG records. You can see the response differences in examples below.


If the RRset changes, RRSIG has to be regenerated to be considered valid. If only RRset changes it will result with invalid signature - and this alone can help you identify if any change to the record set has been made without the approval of the zone owner.
DNSKEY records
But this breeds a question - how can we verify the RRSIG? This is where the public part of ZSK comes into play. As the name suggests, public keys are something that does not need to be guarded and isolated - quite the opposite in fact.
They are hosted publicly in the zone together with RRset and RRSIG records as DNSKEY records. Those records contain the public keys to verify all RRsig in a given zone. Example below shows how DNSKEY record might look like.
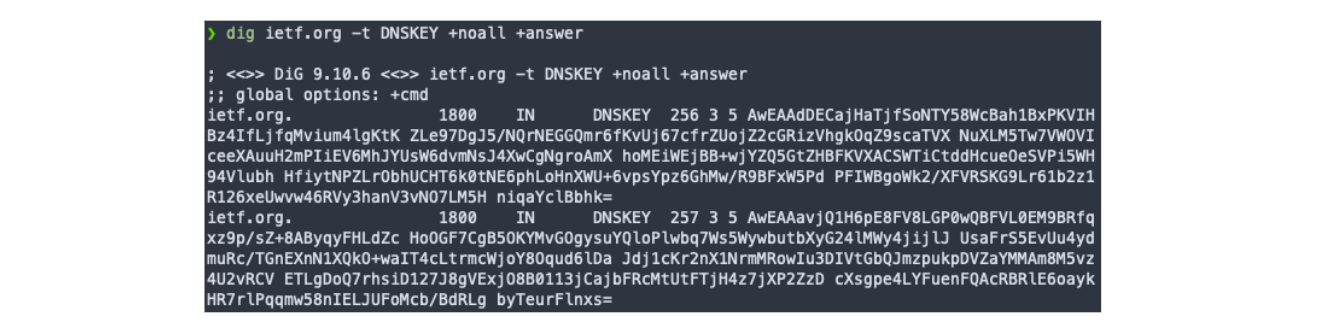
As DNSKEY records can store multiple public keys, there is a flag value associated with it. You can see on the screenshot above, flag 256 and 257. Flag 256 marks a Zone Signing Key (which we already know) whilst value 257 marks a Key Signing Key (more on this one a little later).
A DNSSEC capable resolver can then take RRset, matching RRSIG and DNSKEY record for that zone to verify if RRSIG was generated using the private key portion of ZSK. And here we go, we have trusted records inside of the zone.
Buuuuuuut, there is a small caveat to this - all of this is done under the assumption that we trust the DNSKEY (ZSK portion of it to be precise). And that’s a pretty big assumption to make. Right now we know we can trust RRSIG records to be signed by corresponding DNSKEY.
But how can we trust DNSKEY itself? Turns out, the DNSKEY also has a corresponding RRSIG, but what signs this one? Previously mentioned Key Signing Key.
I heard you like keys
Let’s recap chain of events that we learnt till now:
- Private portion of ZSK (Zone Signing Key) is used to sign RRset
- Output of this operation is stored as RRSIG record
- Public portion of ZSK is stored as DNSKEY record with flag 256 and it can be used to validate RRSIG
- DNSKEY (*256) itself is signed by private portion of KSK (Key Signing Key)
- Output of this operation is also stored as RRSIG record
- Public portion of KSK is stored as DNSKEY record with flag 257 and it can be used to validate RRSIG for DNSKEY
Phew, that’s a lot of keys. Problem right now is - if you use ZSK to validate record sets, and we use KSK to validate ZSK itself - what do we use to validate KSK? This is the place where we leave zone boundaries, as this KSK will be referred to in the parent zone - in this example, .org zone.
DNSSEC chain of trust
Right now we need proof that the .org zone trusts the ietf.org domain and its KSK. It does so using Delegation Signer (DS) records. These records contain a hash of the public KSK of the child domain. As these hashes are unique and one-way, this establishes a trust between the parent (.org) and child (ietf.org) domains.
Of course we also need a way to trust these DS records themselves - so similarly to everything we learnt so far, these DS record sets are also signed by private ZSK of parent domain, published as RRSIG records together with corresponding public portion of parent zone’s ZSK and KSK. The process is identical, so we stop at the same question - how can we trust the public KSK of the .org domain?
You might have guessed it - It’s referenced and trusted by its parent domain - the root domain. And now, the big finale - how can we trust the root domain if it’s, well… root domain and has no parent? The answer is fascinating - Root Signing Ceremony.
It would take another article just about this ceremony, so for everyone interested - you can find its detailed description here. (TL;DR - we can really trust root domain)
So assuming we trust root domain, which trusts .org domain, which trusts ietf.org domain - we established a chain of trust for DNSSEC and now we can be sure that records we received using DNS are valid and have not been tampered with.
Implementing DNSSEC in AWS Route53
Now that we understand why we need DNSSEC and how it works, we can proceed with enabling it for our domains inside AWS Route53. Fortunately, AWS makes this process fairly easy. However, there are some important prerequisites and preparations we need to do to enable DNSSEC in Route53.
Prerequisites:
- The registry for the TLD (Top Level Domain) must support DNSSEC.
- The DNS service provider for the domain must support DNSSEC.
- You must configure DNSSEC with the service provider before you add public keys for your domain to Route53.
Preparations:
- If not already in place, setup zone availability monitoring - in case anything goes wrong, you can quickly rollback changes you made and restore service (preferably enable monitoring for
DNSSECInternalFailureandDNSSECKeySigningKeysNeedingActioncloudwatch metrics). - Lower the zone’s TTL - AWS recommended value for this operation is 3600 seconds (1 hour).
- Lower the SOA TTL and SOA minimum field - these fields determine how long resolvers remember negative answers - lower the value, shorter the time in which resolver will stop assuming negative answer for a domain name.
Right now we can go and enable DNSSEC signing and create a Key Signing Key.
- Go to the Route53 console.
- Go to the Hosted Zone for which you want to enable DNSSEC.
- On the DNSSEC signing tab choose Enable DNSSEC signing.
- On the next page create your KSK using AWS KMS.
- Provide key name in Provide KSK name.
- Choose Create customer managed CMK.
- Provide a key alias in the last field and click Create KSK and enable signing.
This process may take a couple of minutes. Behind the scenes, AWS is creating an asymmetric KMS key and uses it to create a Key Signing Key pair which this zone will use. Additionally, it will also create Zone Signing Keys, but they are fully AWS-managed - you are only responsible for managing KSK.
At this point we have enabled a DNSSEC for a hosted zone. Right now it’s time to verify if everything is working properly and to do so, wait for at least the previous zone’s maximum TTL.
After we confirm everything is working properly it’s time to establish a chain of trust - ergo create a Delegation Signer record in the parent zone. To accomplish this we must do the following:
- Go to the Route53 console.
- Go to the Hosted Zone for which you enabled DNSSEC.
- On the DNSSEC signing tab and click View information to create DS record.
- Under Establish a chain of trust section choose either Route53 registrar (if domain has been registered using Route53) or Another domain registrar - in this example we are gonna assume that domain has been registered using AWS Route53.
- Firstly make sure that we configured correct signing algorithm - ECDSAP256SHA256
- Note down Key type, Signing algorithm and Public key values
- In the Route53 console, go to Registered domains and go to the domain for which DNSSEC has been enabled.
- Find the DNSSEC status field and choose Manage keys next to it.
- Choose the appropriate Key type and Algorithm (based on notes from point 6).
- Paste the Public key noted in point 6.
- Choose Add.
Success! You have now enabled DNSSEC inside of your hosted zone and established a chain of trust with the parent zone. As with everything in DNS, it will take some time to see the changes you made. But after waiting some time, you can verify your work with the following:
- Find name servers for your parent zone using command (I am gonna use example of ietf.org domain, for which parent domain is .org, remember to replace parent domain with relative to your domain)
dig -t NS org +short
- This will return Name Servers for your TLD. Pick one of those and verify if they contain DS record for your domain.
dig -t DS @b0.org.afilias-nst.org. ietf.org
If you can see the DS record in the answer section - congratulations, your domain is now DNSSEC enabled and everybody accessing it can feel a little bit safer doing so!


Get in Touch.
Let’s discuss how we can help with your cloud journey. Our experts are standing by to talk about your migration, modernisation, development and skills challenges.
