
How to Integrate Red Hat SSO with AWS Cognito
In this article, we’ll go through the basic steps involved in configuring Red Hat SSO (Keycloak) as an external identity provider (iDP) in the AWS Cognito User Pool.
Why is this useful?
Along with adding Cognito user pool sign-in through a third party OIDC provider, it enables users already registered with the external iDP to skip the sign-up step and sign in directly to your application using existing credentials.
We’ll use the OpenID Connect (OIDC) mechanism to configure and connect to the Red Hat SSO iDP using the AWS Management Console.
Here are the steps we’ll go through:
- Set up the AWS Cognito user pool
- Create an application on the Red Hat SSO (Keycloak) portal
- Set up the federation iDP in AWS Cognito
- Test the complete set-up
Before we start, there are 3 important prerequisites:
- AWS account with the required privileges
- Red Hat SSO (Keycloak) portal access and administrator knowledge
- Browser or client application to test the solution
Step 1: Set up the AWS Cognito user pool
1. Log in to AWS Console in the appropriate region and go to the Amazon Cognito -> User Pools section.
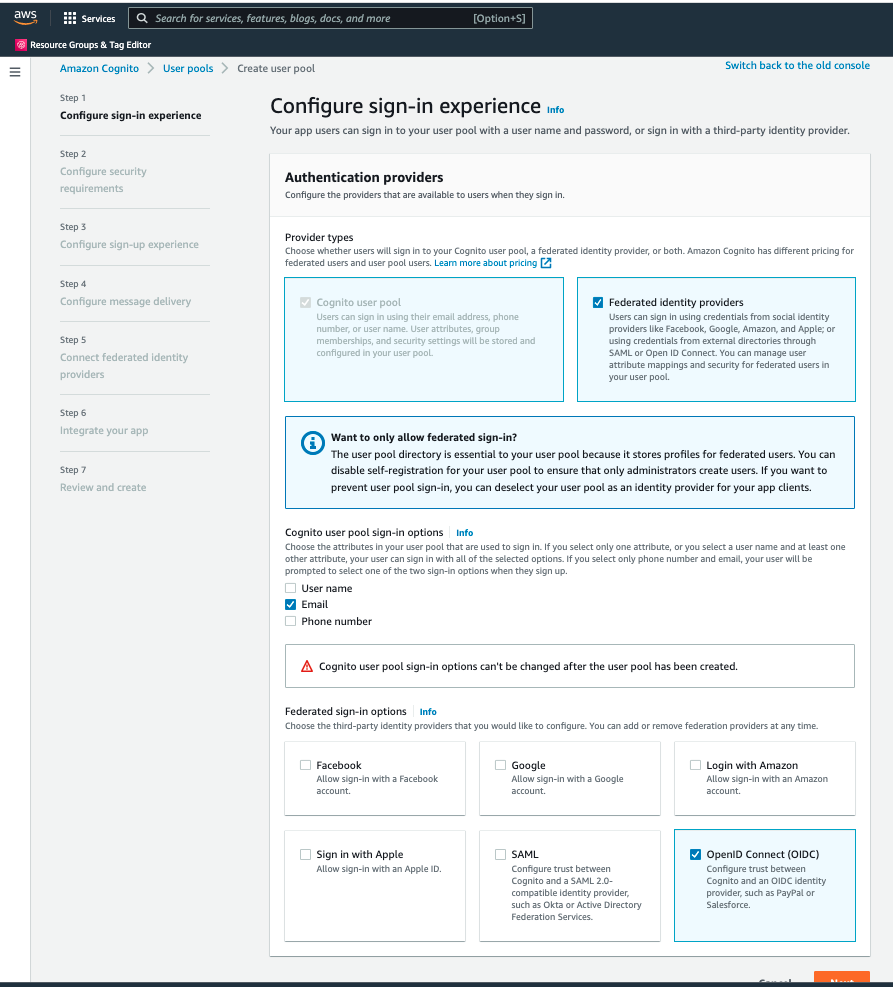
2. Click on "Create User Pool" and then choose the "Federated Identity Providers" checkbox. Choose "Email" from the sign-in options and "OpenID Connect (OIDC)" from the federated sign-in options. Then click "Next".
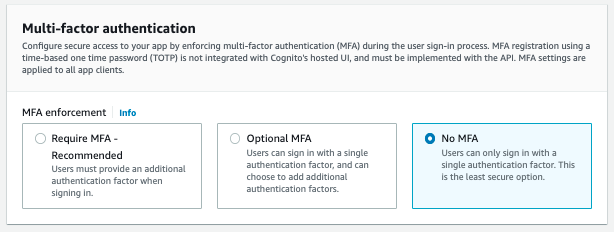
3. In the "Configure Security Requirements" section, choose the default settings with Non-MFA. Then click "Next".
4. In the "Configure Sign-up Experience" section, choose the default settings. However, in the "Custom Attributes" section, add the attribute names that match your identity provider (RH SSO) user attributes. Here’s an example for adding 'city' and 'companyName':

Then click "Next".
In the "Configure Message Delivery" section, choose the "Send Email with Cognito" option and click "Next".
5. We’re going to skip the identity provider configuration for now, so click the "Skip for Now" option. (We’ll configure it later under the "Sign-in Experience" tab in the user pool we created.) Click "Next".
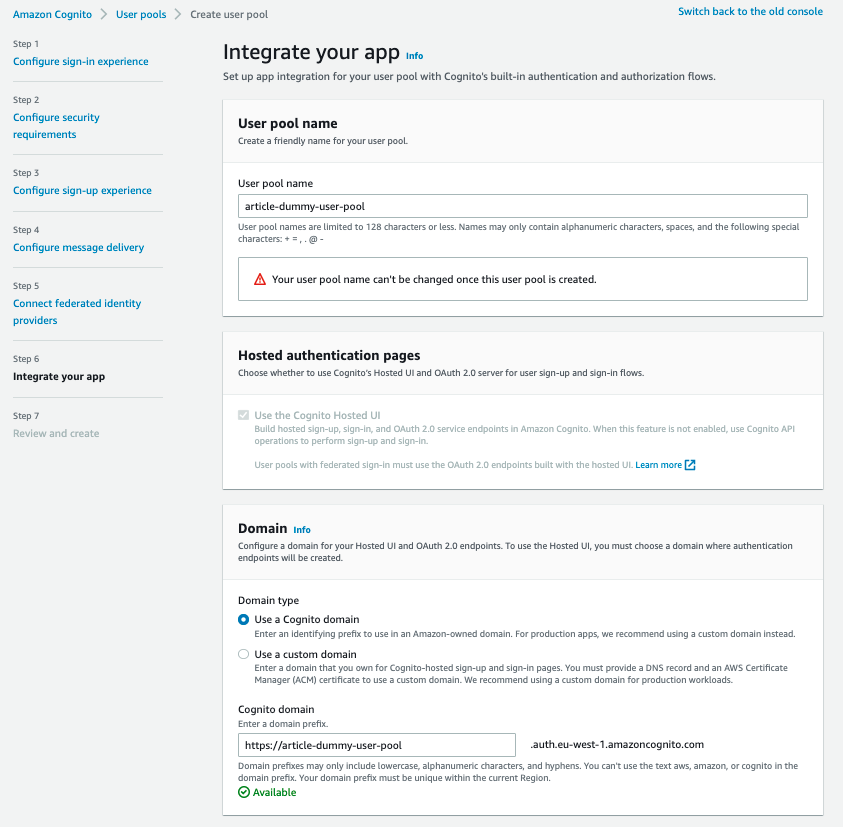
6. In the "Integrate Your App" section, enter your user pool name (like ‘article-dummy-user-pool’). Enter a value for the unique Cognito “domain” name. Note down the domain URL string, e.g.: https://article-dummy-user-pool.auth.aws-region.amazoncognito.com
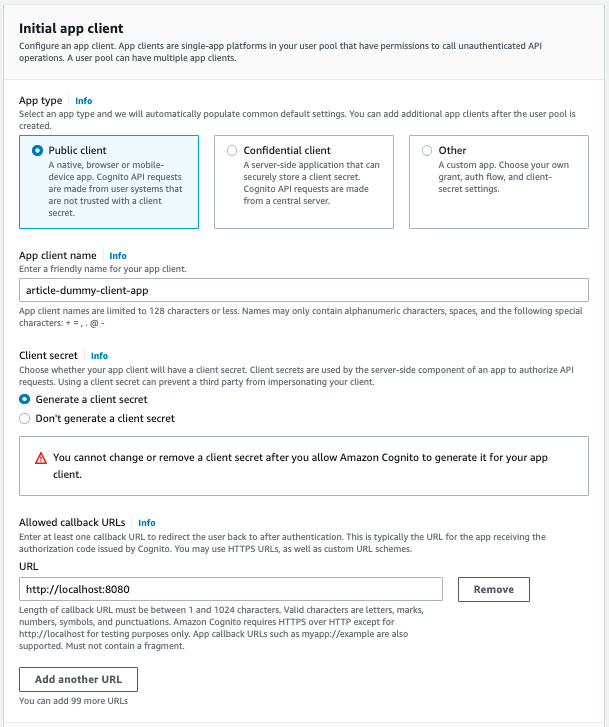
7. After making sure the domain is available, we can configure the initial app client. Select "Public Client" and give it a name, e.g. "article-dummy-client-app".
Then select "Generate a Client Secret". In the "Allowed Callback URLs" section, enter your original application URL or the localhost http://localhost:8080 for testing purposes.
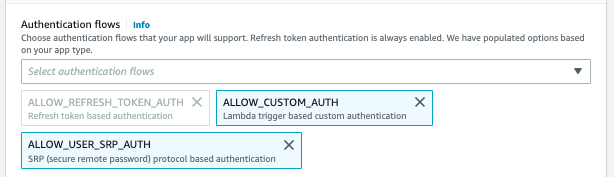
8. Now, in “Advanced App Client Settings”, choose from these “Authentication Flow” values, with other settings as default:
ALLOW_CUSTOM_AUTH
ALLOW_REFRESH_TOKEN_AUTH
ALLOW_USER_SRP_AUTH
Then, choose the following:
- Advanced Security Configurations
- Enable token revocation
- Prevent user existence errors
- Identity Provider
- Cognito user pool (mandatory field; we’ll remove this later)
- OAuth Grant Types
- Authorisation code grant
- Implicit grant
- OpenID Connect Scopes
- aws.cognito.signin.user.admin
- openid
- profile
- Allowed Sign-out URLs
- http://localhost:8080
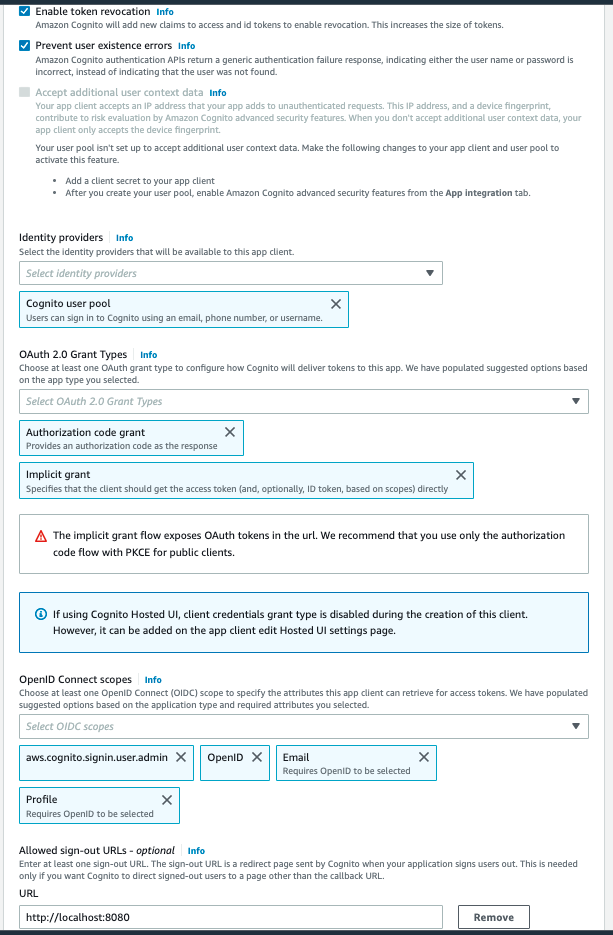
Make sure all “Attribute Read and Write Permissions” are checked before you click “Next”.
9. Now we can “Review” all our settings and click “Create User Pool”.
We’ve now created our user pool with the required settings. But we still need our OIDC-based identity provider. For now, it will have the default “Cognito User Pool” as the identity provider because it was mandatory to select at least one option.
Step 2: Create an application on the Red Hat SSO (Keycloak) portal
Here we’ll create an OIDC client using OpenID connect protocol. The client is an application that wants to participate in single sign-on or request an access token so it can invoke other services on behalf of the authenticated user.
Now we’ll go through the high-level steps, assuming your organisation has predefined policies governing access to the services. (Read about more in-depth configuration here.)
1. In the Clients section, choose the "Add Client" option. Provide the client_id (e.g. “ABC-cognito”) and the client protocol as "openid-connect". When you click "Save”" it creates the client and will take you to the "Settings" tab.
2. In the "Settings" tab, provide values as per the screenshots below:
- Name, Description, Access Type (Confidential)
- Standard Flow, Direct Access Grants and Service Accounts enabled
- Valid redirect URLs as: ( * )

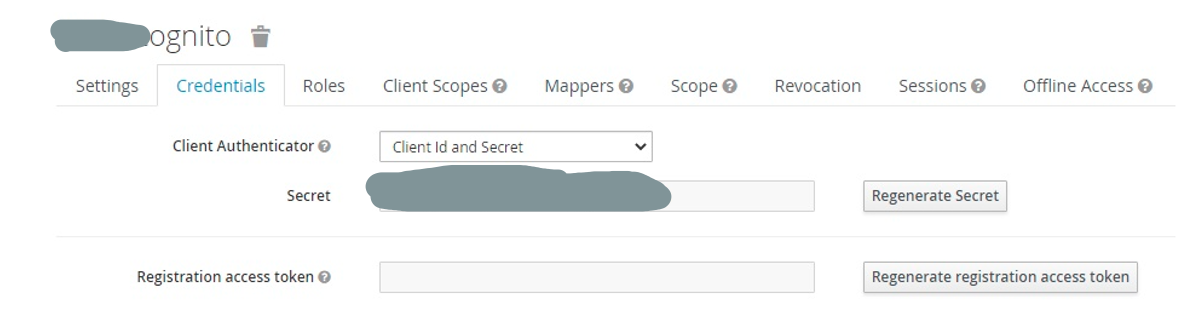
3. In the "Credentials" (Key) tab, use the "Client id and Secret" option and note down your "secret".
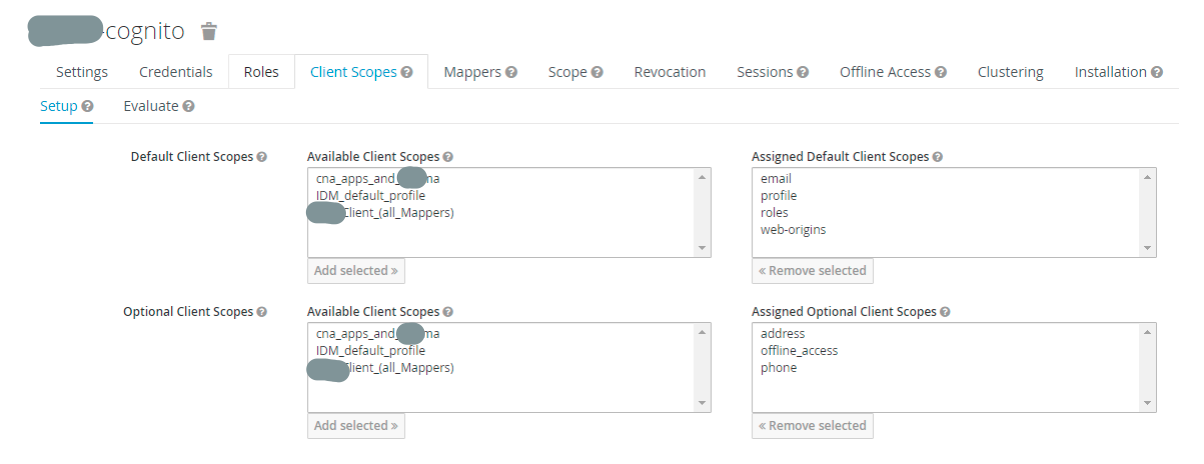
4. In the "Roles" tab, there are no changes. In "Client Scopes" tab, assign default and optional scopes, e.g. as per this screenshot:
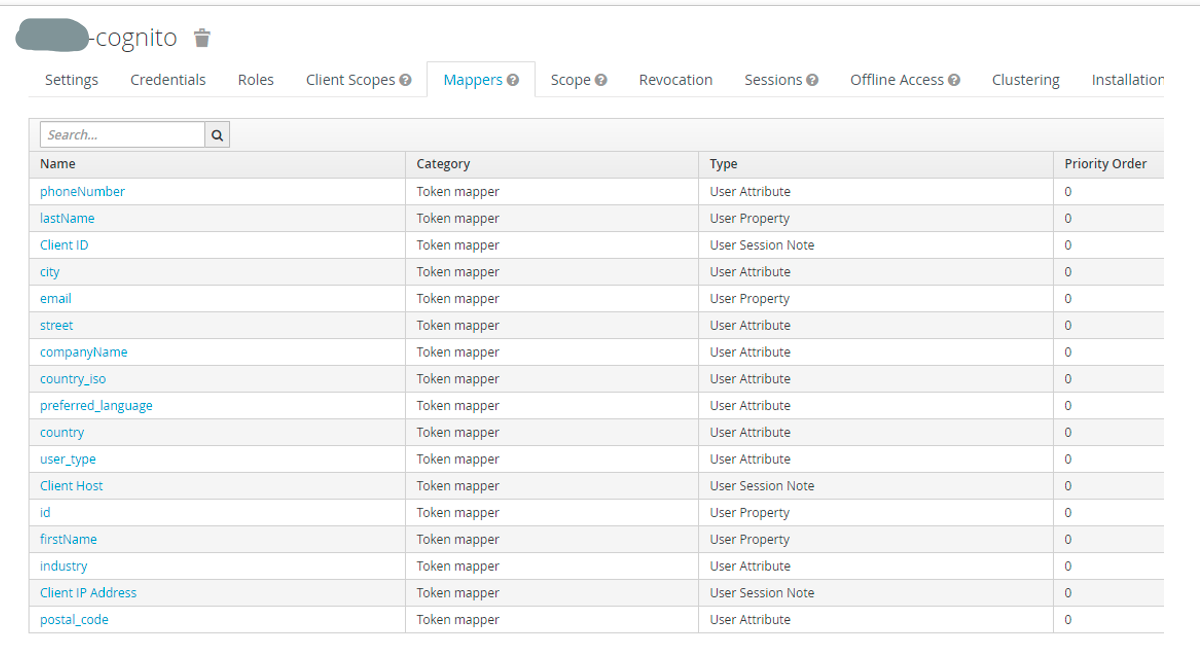
5. In the "Mappers" tab, we’ll configure user attributes, user properties and user session notes in the "Token Mapper" category. Below is an example screenshot:
6. Then, set "Full Scope Allowed" as ON, followed by default (null) settings in the "Revocation", "Sessions" and "Offline Access" tabs. Set "-1" for Node re-registration time-outs in the "Clustering" tab.
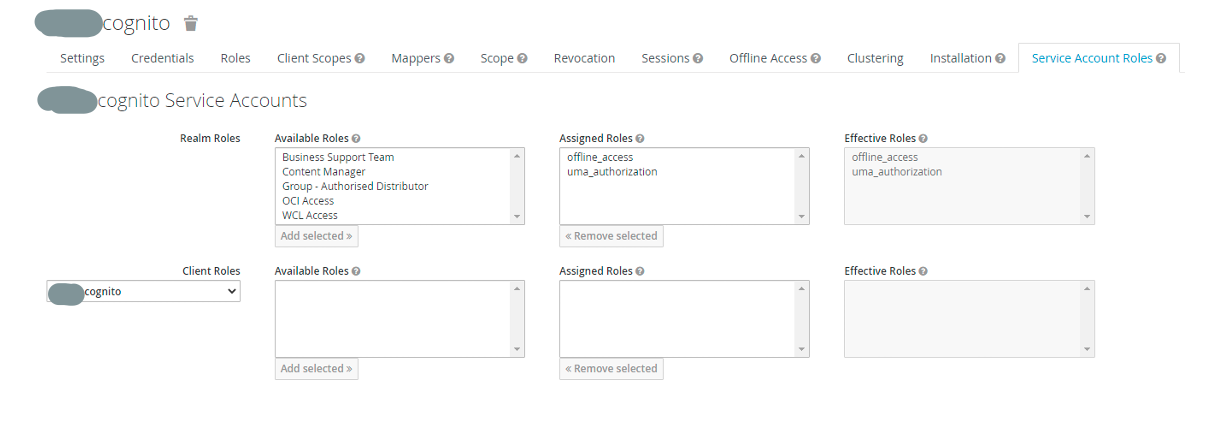
7. Configure the values in the "Service Account Roles" tab as per the example below, keeping the rest of the tabs as default.
Save your settings.
After creating the OIDC client, we can note down:
ClientId : "ABC-cognito"
Secret : xxxxx
IssuerURL – e.g. https://sso-qa.org-name.com/auth/realms/org-name
Your link to access or verify the OpenID server configuration might look like this, which you can test in a browser:
https://sso-qa.org-name.com/auth/realms/org-name/.well-known/openid-configuration
[Note: Configurations in the RedHat SSO Keycloak portal need specific knowledge and might require special access in your organisation. We therefore suggest getting help/confirmation from the administrator.]
Step 3: Set up the federation iDP in AWS Cognito
Now let’s configure the federated identity provider – RHSSO.
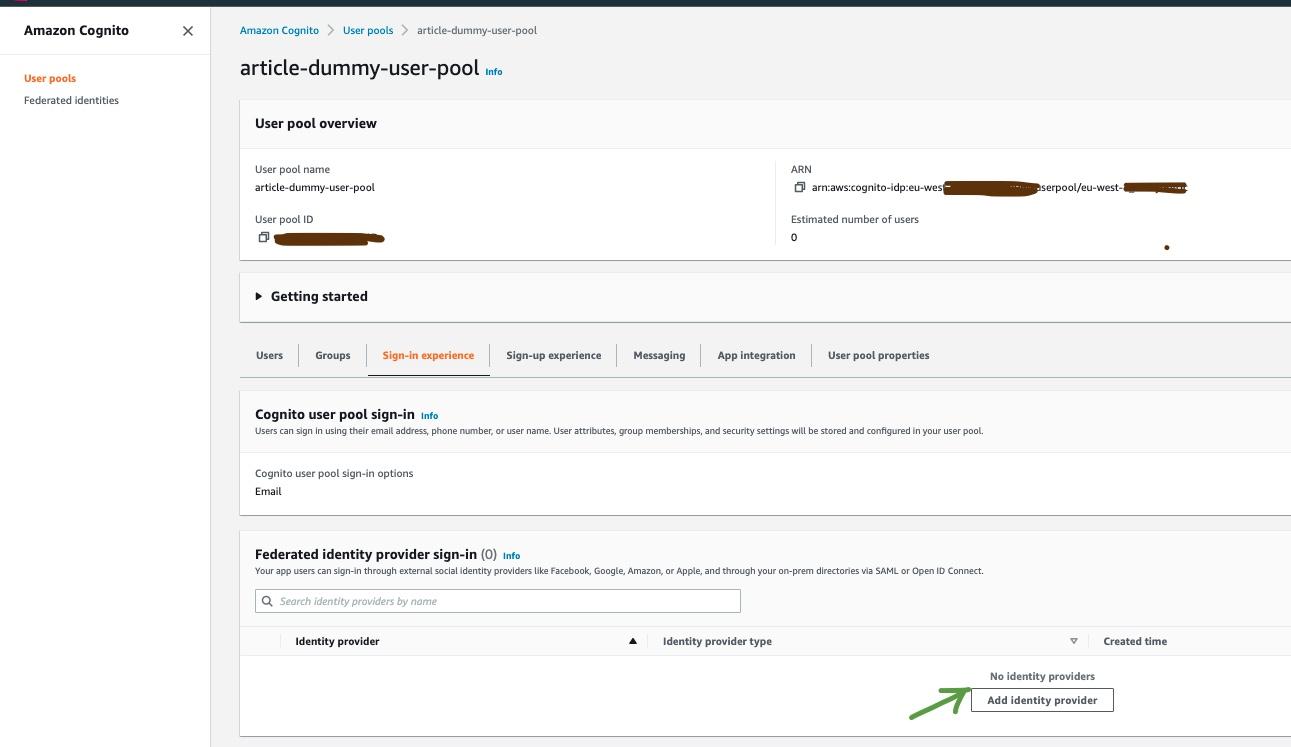
1. Go to the user pool you created. Go to the "Sign-in Experience" tab and click on "Add Identity Provider".
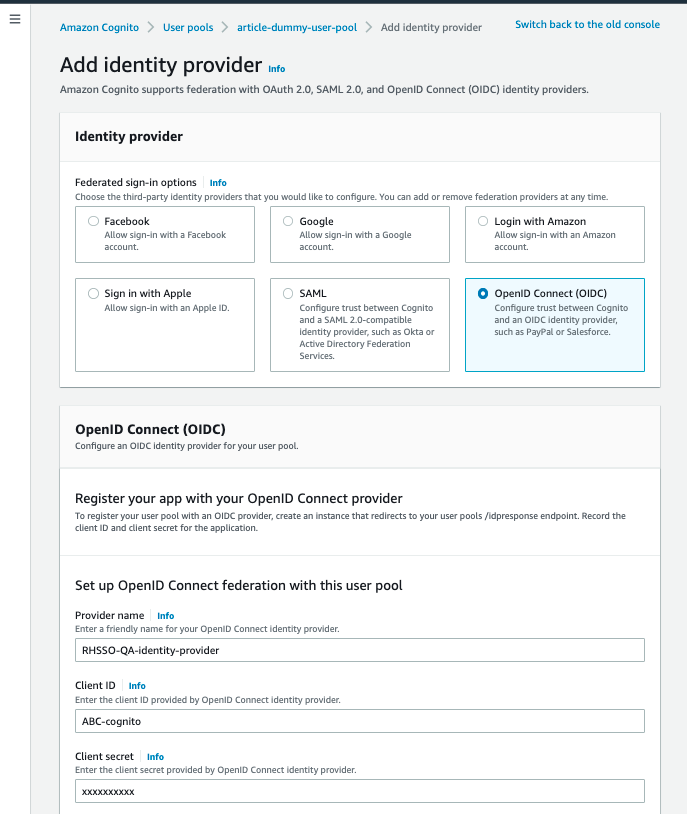
2. Select the “OpenID Connect (OIDC)” option.
Name your iDP, e.g. “RHSSO-QA-identity-provider”, and then enter values for:
Client ID : ABC-cognito
Client Secret : xxxxx
Issuer URL : https://sso-qa.org-name.com/auth/realms/org-name
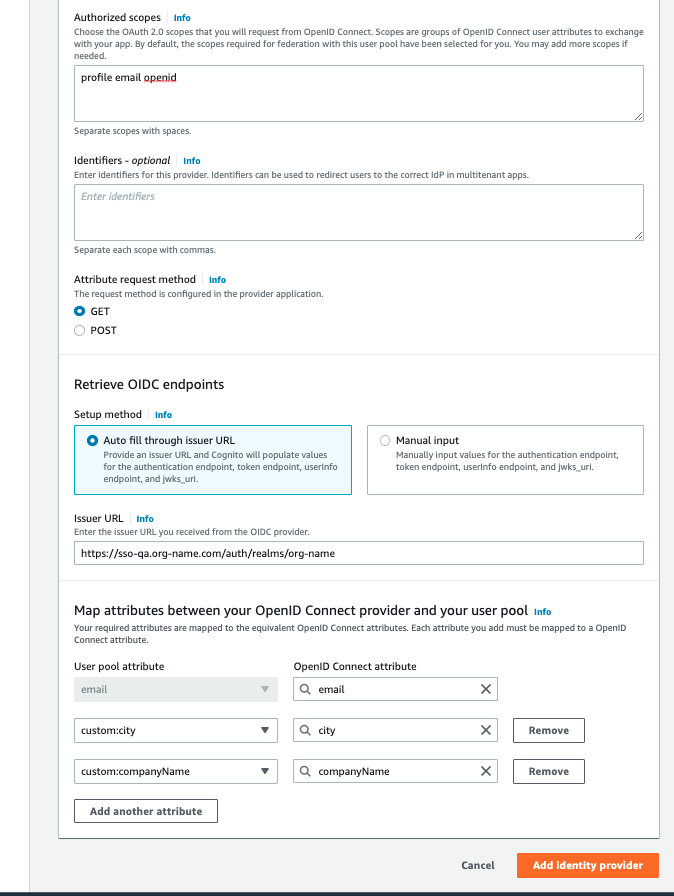
Authorised Scopes: profile email openid
Then, map email and custom user pool attributes to your OIDC user attributes.
Click on the "Add Identity Provider" button.
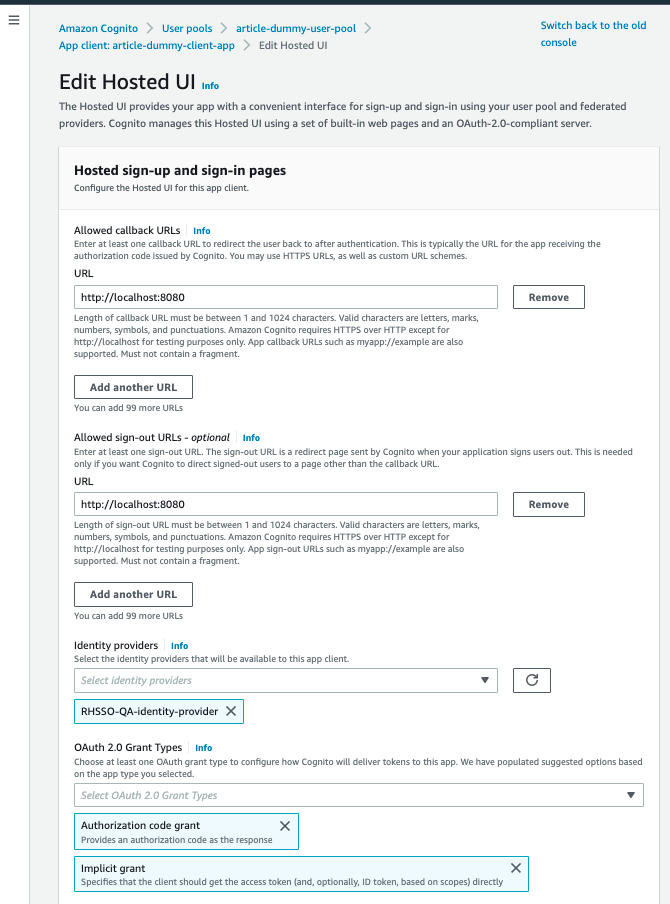
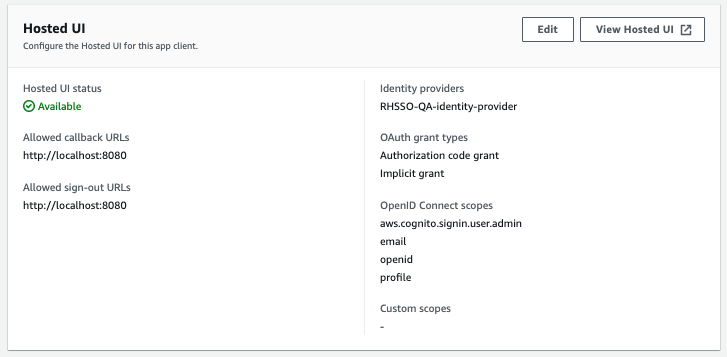
3. Now let’s go to the "App Integration" tab inside our article-dummy-user-pool.
In the "App Clients List" section, click article-dummy-client-app, which we created earlier.
Then, go to the "Hosted UI" section and click "Edit".
In the "Identity Providers" drop down, check "RHSSO-QA-identity Provider" and uncheck "Cognito User Pool". Now click "Save Changes".
4. Our user pool client app is now configured to use the RHSSO as an OIDC-based external identity provider.
Step 4: Test the set-up
To test the set-up, we’ll use the “Hosted UI” feature from the AWS Cognito user pool. With the built-in hosted web UI, Amazon Cognito provides token handling and management for all authenticated users.
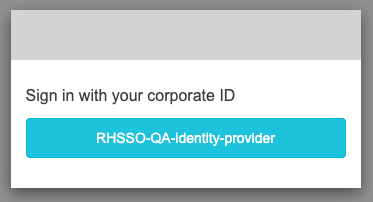
1. Click on “View Hosted UI” inside your app client.
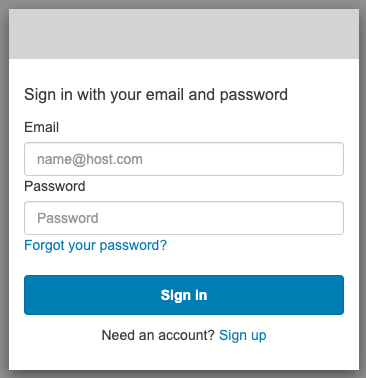
2. It should take you to the organisation’s log-in page, originally hosted on your usual Red Hat SSO portal.
The hosted UI’s URL that internally calls the /oauth2/authorize user pool API should look something like:
https://article-dummy-user-pool.auth.region.amazoncognito.com/oauth2/authorize? client_id=xxxxxxxxxxxxxxxx &response_type=code &scope=aws.cognito.signin.user.admin+email+openid+profile &redirect_uri=http://localhost:8080
3. After successful log-in, the browser should return with the below, e.g. callback URL, that’s pointing to your client application trying to achieve single sign-on:
https://YOUR_APP/redirect_uri?code=AUTHORIZATION_CODE
http://localhost:8080/?code=abcd1234xyzabcd1234xyzabcd123xyz
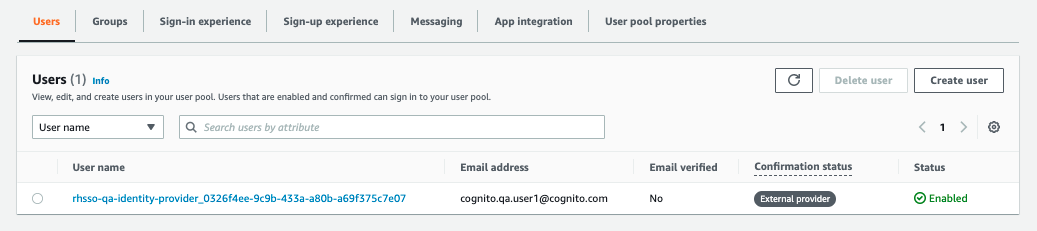
When you look at the user pool “Users” section, you should see an authenticated user entry has been created, which will confirm the set-up has been successfully completed.☺
4. Depending on your client application needs, you can use the authorisation ‘code’ above to invoke the /oauth2/token API endpoint to receive user tokens like access_token and id_token.
You can also use the /oauth2/userInfo endpoint, which returns information about the authenticated user. (You can check out the documentation for the Cognito token or other endpoints here.)
To wrap things up…
We’ve now completed the set-up to integrate Red Hat SSO (Keycloak) as an external federated iDP with AWS Cognito.
For actual configuration with your client web application (UI), you can add your application’s URL (e.g. https://yourapp.com/redirect_uri) as the redirect_url in the Cognito user pool app client. And you may need to configure parameters in your application settings as required, for example below:
User Pool ID
App Client ID/Secret
Cognito Domain URL
Redirect SignIn/SignOut URL
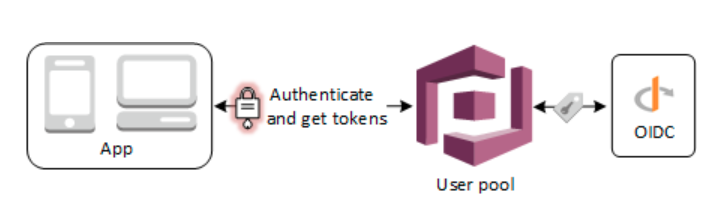
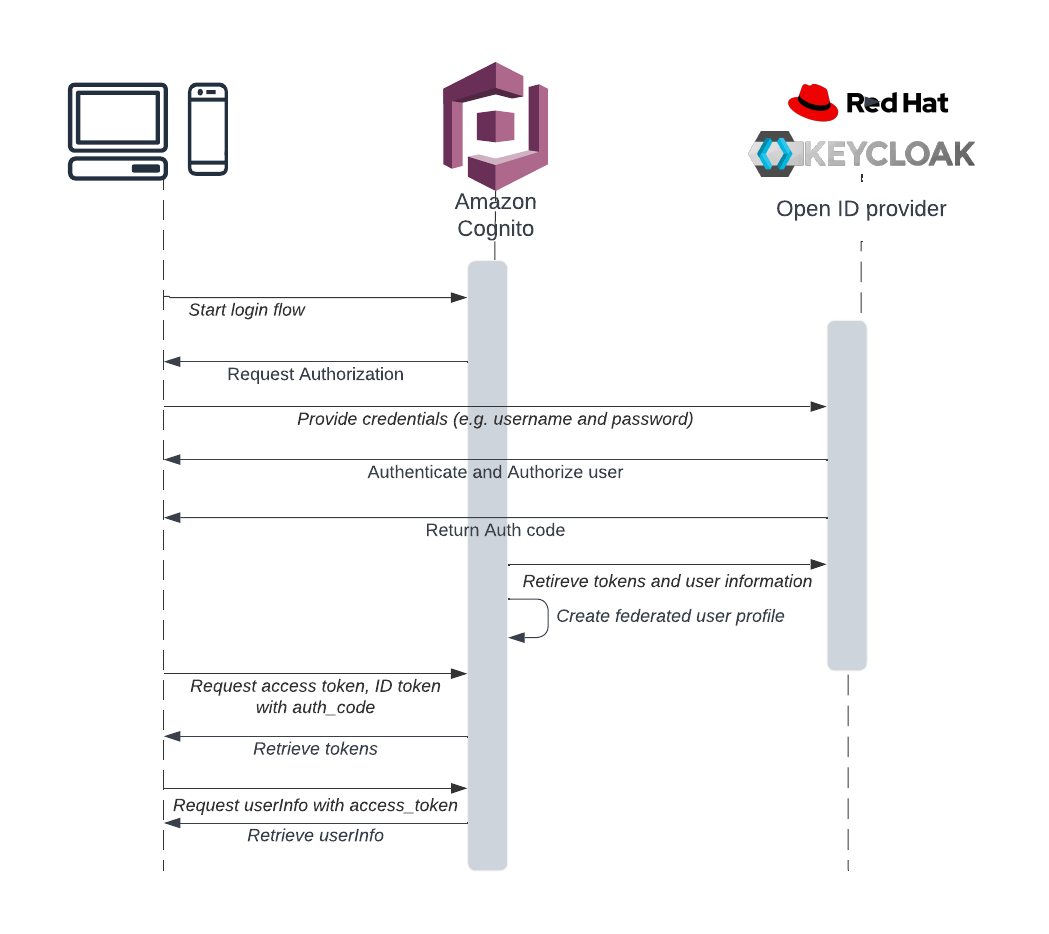
The request must be initiated towards the Login endpoint or Authorize endpoint. An overview of the user authentication flow would look like this:
Let us know how you get on!
References
https://docs.aws.amazon.com/cognito/latest/developerguide/cognito-user-pools-oidc-idp.html
https://www.keycloak.org/docs/latest/server_admin/#_oidc_clients
https://docs.aws.amazon.com/cognito/latest/developerguide/token-endpoint.html


Get in Touch.
Let’s discuss how we can help with your cloud journey. Our experts are standing by to talk about your migration, modernisation, development and skills challenges.
