
Guide for architects and developers:
How to run Kubernetes real-time workloads at scale
In this article we’ll describe the AWS services that we used to achieve real time processing of data, at scale, using the Kubernetes orchestrator managed by AWS and some insights for a big data solution.
Why should I read this article?
Let’s consider thousands of energy meters sending events every second. Imagine the requirement is to receive all the data, apply business rules like separating the data for each client from a multi-tenant data or drive relationships between transactional and fact data to make it meaningful and finally store it in a database. The aim is then to transform raw data into relevant data in real time, and at scale.
And similarly, there are multiple business cases where data needs to be processed within a few seconds to a few minutes like sensor data, IOT etc. Real time processing is gaining popularity nowadays as it provides the decision making capabilities on the fly and many tools like Kubernetes, Spark Streaming etc are available to the market for easiness of achieving it.
When we started to work for Nordcloud, a similar project was assigned to us, which already contained a complex big data solution developed. The missing part was a proper environment to be provisioned for hosting the big data components.
Starting to design the solution for it, we discovered it wasn’t that easy to find everything in one place…or, at least some steps that could guide us in getting started. The goal of our blog post is to briefly point out these steps and help you get started.
Going with AWS as the cloud provider, as our customer requested, we saw that Amazon offers so many options and services for big data solutions…we needed something that is loosely coupled, some solution that can also be relatively easy to move to another cloud provider if need be or, simply, cloud agnostic.
What we chose, for the processing part, was Kafka and Kubernetes, as those technologies are managed by the major cloud providers, but also available for installation and configuration on your on-premises servers or virtual machines.
For the storage part, we chose AWS Redshift as a relational database and AWS DynamoDB as a NoSQL database, gathering the output for further analysis. But those can easily be replaced with any other cloud agnostic databases such as Snowflake (SQL), Cassandra (NoSQL), etc.
Therefore, with this blog we want to summarize the major actions we have taken to configure our infrastructure and prepare it for deploying big data solutions.
Prerequisites
- AWS EKS managed nodes with an AWS IAM role for EKS
Create the EKS role for granting access to AWS resources, this will be used by all the applications that run inside your cluster, through the kubernetes service account. Below we describe the creation of the AWS IAM role with Terraform:
resource "aws_iam_role" "eks_role" {
 name               = "demo-eks-service-role"
 assume_role_policy = <<EOF
{
 "Version": "2012-10-17",
 "Statement": [
   {
     "Sid": "EKSWorkerAssumeRole",
     "Effect": "Allow",
     "Principal": {
       "Service": "ec2.amazonaws.com"
     },
     "Action": "sts:AssumeRole"
   },
   {
     "Sid": "OIDCAssumeRole",
     "Effect": "Allow",
     "Principal": {
       "Federated": "${module.eks.oidc_provider_arn}"
     },
     "Action": "sts:AssumeRoleWithWebIdentity",
     "Condition": {
       "StringEquals": {
          "${replace(module.eks.cluster_oidc_issuer_url, "/https?:\\/\\//", "")}:sub": "system:serviceaccount:${local.namespace}:${local.service_account_name}"
       }
     }
   }
 ]
}
EOF
This service role will be needed when we will be deploying the shared services inside the kubernetes cluster. Separately, attach a policy to grant permissions to specific services like Kafka or DynamoDB.
- MSK cluster configured
- DynamoDB table for storing the processed data
- ECR repositories to store the docker images
- Helm installed
First we'll start by looking at the implementation of Kubernetes on AWS, and take a glimpse into the code. After that we'll look further at scaling, and how to manage that through EKS. At the end, we will wrap things up with what we’ve completed and give some thoughts about what can be improved.
1. Implementation on AWS
The below diagram represents the functionality of our application. Supposedly, a client will be sending data to the kafka topic for processing. There are multiple layers of processing as shown in the image and data is, in the end, stored into Redshift and DynamoDB tables after final processing.
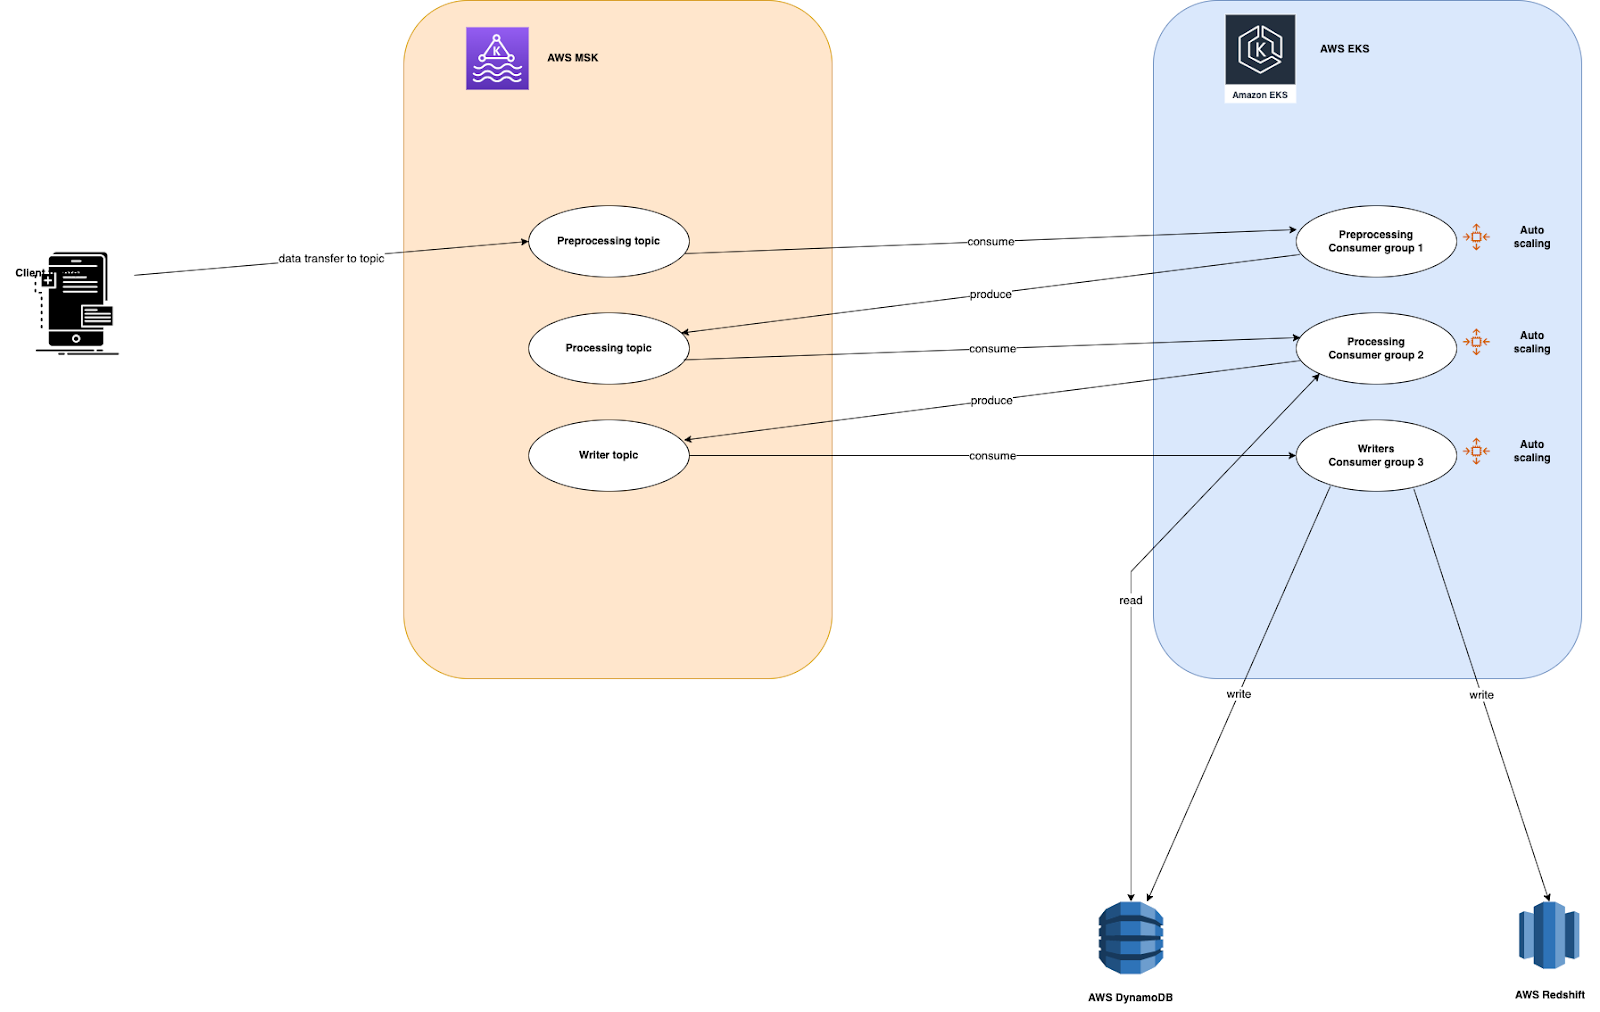
In this architecture, we are using MSK as a message broker. MSK is a managed service provided by AWS for the applications that need to use kafka on AWS. Clients will be sending data to the kafka topic and we will design consumers with auto scaling to process the data. For this example, as we do not have any real client sending the data, we will be creating a kafka producer which will run as a pod in the kubernetes cluster.
For processing we are using AWS EKS, which helps design the application as microservices, by breaking down the application into smaller components, and applying business logic to it. Once the data is processed it will be stored in Redshift. Redshift is a petabyte storage data warehouse solution provided by AWS. We are also using DynamoDB here to support quick access to the data from within the application.
We need to create the following 3 components for the application to work:
Kafka topic - is responsible to organize the incoming messages, like raw data, that can be put under an ingest topic. Here we will be using the ingest topic to get the data from the client side i.e. kafka producer. We are creating this topic as a part of the kafka producer.
def create_topic(bootStrapBrokers):
   try:
       client = KafkaClient(bootstrap_servers=bootStrapBrokers)
       future = client.cluster.request_update()
       client.poll(future=future)

       metadata = client.cluster
       logger.info(f' current topics in Kafka are {metadata.topics()}')
       if preprocessingKafkaTopic not in metadata.topics():
           admin_client = KafkaAdminClient(
               bootstrap_servers= bootStrapBrokers,
               client_id='test'
           )

           topic_list = []
           topic_list.append(NewTopic(name=ingestKafkaTopic, num_partitions=5, replication_factor=3))
           admin_client.create_topics(new_topics=topic_list, validate_only=False)
           logger.info(f' Kafka topic created successfully')
       else:
           logger.info(f' Kafka topic already exists')
   except Exception as e:
       logger.error(f' Failed to create topic due to {e}')
       raise
Use the below function to get the bootstrap servers of kafka. Bootstrap servers are required to perform any function on Kafka.
def get_kafka_bootstrap_server(MSK_ARN):
   try:
       response = kafka_client.get_bootstrap_brokers(
           ClusterArn=MSK_ARN,
       )
       logger.info(f' response for bootstrap servers returned from kafka: {response}')
       return response.get('BootstrapBrokerString').split(',')
   except Exception as e:
       logger.error(f' Failed while getting bootstrap server details due to : {e}')
       raise
Kafka producer - is responsible to put data into the kafka topic for further processing. A python code will connect to the MSK broker servers and write avro encoded messages to the ingest topic. As mentioned earlier, the ingest topic is also created as part of the producer code. Therefore, it will verify and create the topic if it does not exist already. The producer will be running continuously as a kubernetes pod and keep sending the messages to the kafka topic.
def kafka_producer(bootStrapBrokers, topicName):
   try:
       producer= KafkaProducer(bootstrap_servers= bootStrapBrokers)
       while(True):
           message = {"id": random.randint(0,1000), "name": ''.join(random.choice(string.ascii_lowercase) for i in range(10)), "favorite_number": random.randint(0,100), "favorite_color": "red"}
           logger.info(f' data type of message is {type(message)}  and content of msg to send is: {message}')
           msg= create_avro_meeesage(message, PreProcessingSchema)
           producer.send(topicName, value=msg)
           logger.info(f' message sent successfully to the topic {topicName}')
   except Exception as e:
       logger.error(f' Failed while sending messages to kafka due to {e}')
       raise
Kafka consumers - are responsible to consume messages from the kafka topic. As we have multiple topics to store intermediate data for another process to consume, we need to create multiple consumers according to the topics. We have three consumers here named preprocessing, processing and writer. All the consumers code is written in python and will be running as kubernetes pods. Kafka Consumers poll for messages from the respective topic, process the data and at the end write it into DynamoDB and Redshift. Preprocessing and processing logic looks similar to the below code snippet, where data is read from a Kafka topic and written back to the next topic after applying some logic to it.
def preprocessing(topicName, model:Type[AvroModel], producer):
   try:
       for message in consumer:
           logger.info('deserialize avro message')
           msg= read_avro_message(message, model)
           logger.info(f' message read from kafka topic {readkafkaTopic} is {msg}')
           msg['preprocessing_status']='Done'
           msg= create_avro_meeesage(msg, ProcessingSchema)
           producer.send(topicName, value=msg)
           logger.info(f' message written to {topicName} topic successfully')

   except Exception as e:
       logger.error(f' Failed while pre-processing the message from topic {topicName} due to {e}')
       raise

if __name__ == '__main__':
   try:
       bootStrapBrokers= get_kafka_bootstrap_server(MSK_ARN)
       producer= KafkaProducer(bootstrap_servers= bootStrapBrokers)
       while(True):
           consumer= KafkaConsumer(readkafkaTopic, bootstrap_servers= bootStrapBrokers, group_id="preprocessing")
           preprocessing(writekafkaTopic, PreProcessingSchema, producer)
   except Exception as e:
       logger.error(f'main error :{e}')
Here is a code snippet for writing data to Redshift and DynamoDB.
def writer(redshift_obj:RedshiftWriter, dynamodb_obj:DynamodbWriter, model:Type[AvroModel], consumer):
   try:
       for message in consumer:
           msg= read_avro_message(message, model)
           logger.info(f' message read from kafka topic {readkafkaTopic} is {msg}')
           msg['writer_status']='Done'
           logger.info('Write data to Dynamodb')
           dynamodb_obj.write(msg)
           logger.info('write data to redshift')
           redshift_obj.write(msg)
           logger.info('data inserted to databases successfully')
   except Exception as e:
       logger.error(f 'Failed while writing the message to database due to {e}')
       raise


if __name__ == '__main__':
   try:
       bootStrapBrokers= get_kafka_bootstrap_server(MSK_ARN)
       redshift_obj= RedshiftWriter(redshift_table, redshift_host, redshift_database, redshift_user, redshift_pswd, redshift_schema)
       dynamodb_obj = DynamodbWriter(dynamodb_table,AWS_REGION)
       while(True):
           consumer= KafkaConsumer(readkafkaTopic, bootstrap_servers= bootStrapBrokers, group_id="writer")
           writer(redshift_obj, dynamodb_obj, WriterSchema, consumer)
   except Exception as e:
       logger.error(f'main error :{e}')
As the kafka producer is producing the messages continuously at a very high rate, a single consumer might not be able to process all the messages as soon as they arrive (especially if the processing part will also take some time). So kafka consumer is deployed as part of a consumer group.
The benefit of having a consumer group is that you can create multiple instances of the same consumer inside the consumer group, and they will all be consuming the messages from different partitions of the same topic in parallel. But, auto scaling needs to be set up, in order to increase the number of consumers created in the consumer group. Here is where Keda comes into the picture.
Note: We have a base directory which includes the commonly used functions like creating and reading avro data, defining schema of avro data etc. It also includes functions related to creating connections and writing data to databases like DynamoDB.
2. Autoscaling in the architecture
Cluster autoscaler
On AWS, the cluster autoscaler is used to automatically scale in and out the worker nodes of the Kubernetes cluster, for which it uses AWS EC2 Auto Scaling Groups. The cluster autoscaler runs as a Deployment in the cluster and it's useful if clients send large amounts of data during specific hours or specific periods of the month.
Let’s deep dive into the installation and configuration of the cluster autoscaler.
- Create the IAM policy that grants the permissions to the cluster autoscaler. In our example, we used Terraform to provision our infrastructure, as such:
resource "aws_iam_policy" "autoscaling" {

 name = "${var.name}-cluster-autoscaler"
 path = "/"

 policy = <<EOF
{
 "Version": "2012-10-17",
 "Statement": [
   {
     "Effect": "Allow",
     "Action": [
       "autoscaling:DescribeAutoScalingGroups",
       "autoscaling:DescribeAutoScalingInstances",
       "autoscaling:DescribeLaunchConfigurations",
       "autoscaling:DescribeTags",
       "ec2:DescribeInstanceTypes",
       "ec2:DescribeLaunchTemplateVersions"
     ],
     "Resource": ["*"]
   },
   {
     "Effect": "Allow",
     "Action": [
       "autoscaling:SetDesiredCapacity",
       "autoscaling:TerminateInstanceInAutoScalingGroup",
       "ec2:DescribeInstanceTypes",
       "eks:DescribeNodegroup"
     ],
     "Resource": ["*"]
   }
 ]
}
EOF
}
Create the role that the cluster autoscaler requires to examine and modify EC2 Auto Scaling Groups:
resource "aws_iam_role" "autoscaling" {

 name               = "demo-cluster-autoscaler-service-role"
 assume_role_policy = <<EOF
{
  "Version": "2012-10-17",
  "Statement": [
     {
        "Effect": "Allow",
        "Principal": {
           "Federated": "${module.eks.oidc_provider_arn}"
        },
        "Action": "sts:AssumeRoleWithWebIdentity",
        "Condition": {
           "StringEquals": {
              "${replace(module.eks.cluster_oidc_issuer_url, "/https?:\\/\\//", "")}:sub": "system:serviceaccount:${local.cluster_autoscaler_namespace}:${local.cluster_autoscaler_sa}"
           }
        }
     }
  ]
}
EOF

 tags = var.tags

}
Attach the policy previous created to the cluster autoscaler role:
resource "aws_iam_role_policy_attachment" "autoscaling" {

 policy_arn = aws_iam_policy.autoscaling.arn
 role       = aws_iam_role.autoscaling.name
}- Get the manifest file for configuring the cluster autoscaler. Run the below command to get the values.yaml file:
wget https://raw.githubusercontent.com/kubernetes/autoscaler/master/charts/cluster-autoscaler/values.yamlKeep only the parameters that must be added for your specific configuration. Modify the aws region and aws account number parameters to match the ones where your resources are deployed and use the cluster autoscaler role created above.
In our example, we used the following manifest file to create the kubernetes components for cluster autoscaler:
autoDiscovery:
 # cloudProviders `aws`, `gce`, `magnum` and `clusterapi` are supported by auto-discovery at this time
 # AWS: Set tags as described in https://github.com/kubernetes/autoscaler/blob/master/cluster-autoscaler/cloudprovider/aws/README.md#auto-discovery-setup

 # autoDiscovery.clusterName -- Enable auto discovery for `cloudProvider=aws`, for groups matching `autoDiscovery.tags`.
 # Enable auto discovery for `cloudProvider=cluster api`, for groups matching `autoDiscovery.labels`.
 # Enable auto discovery for `cloudProvider=gce`, but no MIG tagging required.
 # Enable auto discovery for `cloudProvider=magnum`, for groups matching `autoDiscovery.roles`.
 clusterName: "demo-eks-cluster" # cluster.local

 # autoDiscovery.tags -- ASG tags to match, run through `tpl`.
 tags:
   - k8s.io/cluster-autoscaler/enabled
   - k8s.io/cluster-autoscaler/{{ .Values.autoDiscovery.clusterName }}
 # - kubernetes.io/cluster/{{ .Values.autoDiscovery.clusterName }}

cloudProvider: aws

# awsRegion -- AWS region (required if `cloudProvider=aws`)
awsRegion: <AWS_REGION>

rbac:
 # rbac.create -- If `true`, create and use RBAC resources.
 create: true
 serviceAccount:
   # rbac.serviceAccount.annotations -- Additional Service Account annotations.
   annotations:
     eks.amazonaws.com/role-arn: arn:aws:iam::<AWS_ACCOUNT_NO>:role/demo-cluster-autoscaler-service-role
   # rbac.serviceAccount.create -- If `true` and `rbac.create` is also true, a Service Account will be created.
   create: true
   # rbac.serviceAccount.name -- The name of the ServiceAccount to use. If not set and create is `true`, a name is generated using the full name template.
name: "cluster-autoscaler"- Once the manifest file is updated with the cluster details, we can proceed with deploying the cluster autoscaler using helm charts. Follow below steps for the same.
I. Add helm repository
helm repo add autoscaler https://kubernetes.github.io/autoscalerII. Update helm repositories
helm repo updateIII. Install cluster autoscaler in kube-system namespace with helm chart using the manifest file (values.yaml) that we created earlier.
helm upgrade --install cluster-autoscaler autoscaler/cluster-autoscaler --namespace kube-system --values values.yaml --version 9.19.1- As the cluster autoscaler is installed successfully now, it should be up as a pod in the kube-system namespace with the running status. Run below command to verify the cluster autoscaler pod:
kubectl get pods -n kube-system | grep cluster-autoscalerKeda event-driven auto scaling for Kubernetes with Kafka
Keda is an event driven autoscaler provided by Kubernetes, that can scale any container based on the number of events to be processed. Keda works with Kubernetes components like Horizontal Pod Autoscaler (HPA), which internally performs autoscaling.
In our example, we need to scale the kafka consumers based on the events or messages in the kafka topics. Keda supports multiple sources like Apache Kafka and AWS Cloudwatch, based on which we can do the autoscaling. A scaled object needs to be created where we define the kafka topic and consumer group on which we want to perform the scaling.
Let’s first install and configure keda with helm charts:
I. Add helm repository
helm repo add kedacore https://kedacore.github.io/chartsII. Update helm repositories
helm repo updateIII. Create keda namespace
kubectl create namespace kedaIV. Install keda in keda namespace with helm chart
helm install keda kedacore/keda --version 2.7.1 --namespace keda3. Deploying shared services
Once the cluster autoscaler and keda autoscaler are installed and configured, there are some common resources that need to be deployed, resources like a namespace (where our application resides), a service account or common deployments in your cluster that apply to multiple services. We are using the below manifest file to deploy the namespace.
apiVersion: v1
kind: Namespace
metadata:
 name: demo-namespace
Now, replace the ARN of the EKS role, created in prerequisites, as an annotation when we create the service account resource inside our cluster. We do this by using a manifest file:
apiVersion: v1
kind: ServiceAccount
metadata:
 name: demo-service-account
 namespace: demo-namespace
 annotations:
   "eks.amazonaws.com/role-arn":
"arn:aws:iam::<AWS_ACCOUNT_NO>:role/demo-eks-service-role"
Deploy the namespace and the service account with kubectl apply command.
kubectl apply -f /path/to/manifest/file.yaml4. Pushing the images to ECR
After creating the shared services, we can now deploy the kafka producer and consumers to test the application. We are using ECR to store the docker images for the producer and consumers. We used the following aws and docker commands to connect and push the images to ECR:
aws ecr get-login-password --region <AWS_REGION> | docker login --username AWS --password-stdin <AWS_ACCOUNT_NO>.dkr.ecr.<AWS_REGION>.amazonaws.comdocker build --platform=linux/amd64 -t ubuntu:<TAG> -f ./path/to/Dockerfile .docker tag ubuntu:<TAG_UBUNTU> <AWS_ACCOUNT_NO>.dkr.ecr.<AWS_REGION>.amazonaws.com/<IMAGE_NAME>:<TAG>docker push <AWS_ACCOUNT_NO>.dkr.ecr.<AWS_REGION>.amazonaws.com/<IMAGE_NAME>:<TAG>5. Deploying the applications
We have created a deployment file for the producer and each consumer to deploy it as a kubernetes pod. Here is the sample file for deploying a specific component. For the consumer components, an additional scaled object has been created. Once the scaled object is created, the Keda operator will monitor this scaled object and create the HPA resource for handling the scaling based on the number of events in the kafka topic.
apiVersion: apps/v1
kind: Deployment
metadata:
 name: <CONSUMER_NAME>
 namespace: demo-namespace
spec:
 strategy:
   type: RollingUpdate
 selector:
   matchLabels:
     app: <CONSUMER_NAME>
 replicas: 1
 template:
   metadata:
     labels:
       app: <CONSUMER_NAME>
   spec:
     serviceAccountName: demo-service-account
     automountServiceAccountToken: false
     containers:
       - name: <CONSUMER_NAME>
         image: <AWS_ACCOUNT_NO>.dkr.ecr.<AWS_REGION>.amazonaws.com/<IMAGE_NAME>:<TAG>
         imagePullPolicy: Always

---

apiVersion: keda.sh/v1alpha1
kind: ScaledObject
metadata:
 name: <SCALED_OBJECT_NAME>
 namespace: demo-namespace
spec:
 scaleTargetRef:
   name: <SCALED_TARGET_NAME> # must be in the same namespace as the ScaledObject
 #    envSourceContainerName: {container-name}  #Optional. Default: deployment.spec.template.spec.containers[0]
 pollingInterval: 30  # Optional. Default: 30 seconds
 cooldownPeriod:  300 # Optional. Default: 300 seconds
 minReplicaCount: 0   # Optional. Default: 0
 maxReplicaCount: 100 # Optional. Default: 100
 triggers:
   - type: kafka
     metadata:
       bootstrapServers:
<BOOTSTRAP_SERVER_1:9092,BOOTSTRAP_SERVER_2:9092,BOOTSTRAP_SERVER_3:9092>
       consumerGroup: <CONSUMER_GROUP_NAME>
       topic: <TOPIC_NAME>
       lagThreshold: '100'
       offsetResetPolicy: latest
       allowIdleConsumers: "false"
       scaleToZeroOnInvalidOffset: "false"
       version: 1.0.0
The number of pods (consumers) will be created based on the number of partitions in the given topic. Other important parameters from the scaling object are:
- minReplicaCount: minimum number of pods running in case of no events in kafka topic.
- maxReplicaCount: maximum number of pods running. This value is overridden by the number of partitions in the given topic. We can not have more consumers than the number of partitions in a specific topic.
- cooldownPeriod: waiting time before performing scale in or scale out.
Deploy the kafka producer and consumers with their respective deployment yaml file using below command:
kubectl apply -f /path/to/file.yaml6. Testing the applications
AWS MSK does not provide a way to check the topics and messages of a topic. To see the messages or events in the kafka topic, we deployed another pod with ubuntu and kafka scripts installed on it so we can see more details about the offset lags for a specific topic in a consumer group. Run below commands to connect to it and check the offset of the preprocessing topic to get its status:
kubectl exec -it <ubuntu-pod-name> -- bashcd kafka_2.12-3.1.0/bin/./kafka_2.12-3.1.0/bin# ./kafka-consumer-groups.sh --bootstrap-server "<bootstrap_server_1:9092,bootstrap_server_2:9092,bootstrap_server_3:9092>" --group preprocessing --describe
As there are messages in each partition, 5 pods for each kafka consumer (with auto scaling enabled), for 5 partitions in MSK topic, should be running based on our scaled object. To see the pods created, list the pods in demo-namespace namespace:
kubectl get pods -n demo-namespace
In our scenario, if we remove the kafka producer deployment, which will stop sending events, run the below command again after a few minutes to make sure all the messages are processed from our preprocessing kafka topic. You’ll observe that the current offset is the same as the log end offset:
/kafka_2.12-3.1.0/bin# ./kafka-consumer-groups.sh --bootstrap-server "<bootstrap_server_1:9092,bootstrap_server_2:9092,bootstrap_server_3:9092>" --group preprocessing --describe
As all the messages are processed successfully from preprocessing kafka topic, preprocessing consumer is scaled-in back to 0. Check that by listing the pods for your consumer and see that no consumer pod for preprocessing is running anymore. Same steps can be performed to observe the auto scaling for our other consumers.
kubectl get pods -n demo-namespace | grep <consumer_group_name>Conclusion
We have used EKS with managed nodes for this article but we can also use EKS with fargate where autoscaling is handled internally and it is serverless.
For the complete automation of your k8s deployments, ArgoCD can be used to automatically apply the changes to your cluster. But that’s a topic for another article, and not an MSK topic!
References:


Get in Touch.
Let’s discuss how we can help with your cloud journey. Our experts are standing by to talk about your migration, modernisation, development and skills challenges.
