
AWS CodePipeline Approval Stage Without Login in AWS Console
- Solution Overview
- Walkthrough
- Creating AWS Lambda function (URL Validation) with function URL
- Creating AWS SNS Topic
- Setup AWS SES with email identity
- Creating and configure an AWS DynamoDB table
- Creating another AWS Lambda function (Custom URL Generator)
- Creating new IAM Policies and adding it to the respective AWS Lambda function
- Attach IAM Policy to Lambda function (Custom URL Generator) execution role
- Creating IAM policy for AWS Lambda function (URL Validation)
- Attach IAM Policy to Lambda function (URL Validation) execution role
- Conclusion
All DevOps engineers who are first establishing a CI/CD deployment on AWS have encountered a scenario in which a manual approval stage must be added after the source stage. The majority of you would have set up an SNS subject with an email subscription to deliver the approval link to the authorised user. Each time CodePipeline is triggered, this authorised individual will receive a link.
As we all know, the authorised user receives an email with an approval link. When you click on the approval link, you are redirected to the AWS login page, where the authorised user must log in to accept or reject the AWS CodePipeline.
This blog article gives the authorised individual a workaround to avoid logging into the AWS console for the approval stage by utilising a custom created URL for AWS CodePipeline approval and rejection.
Solution Overview
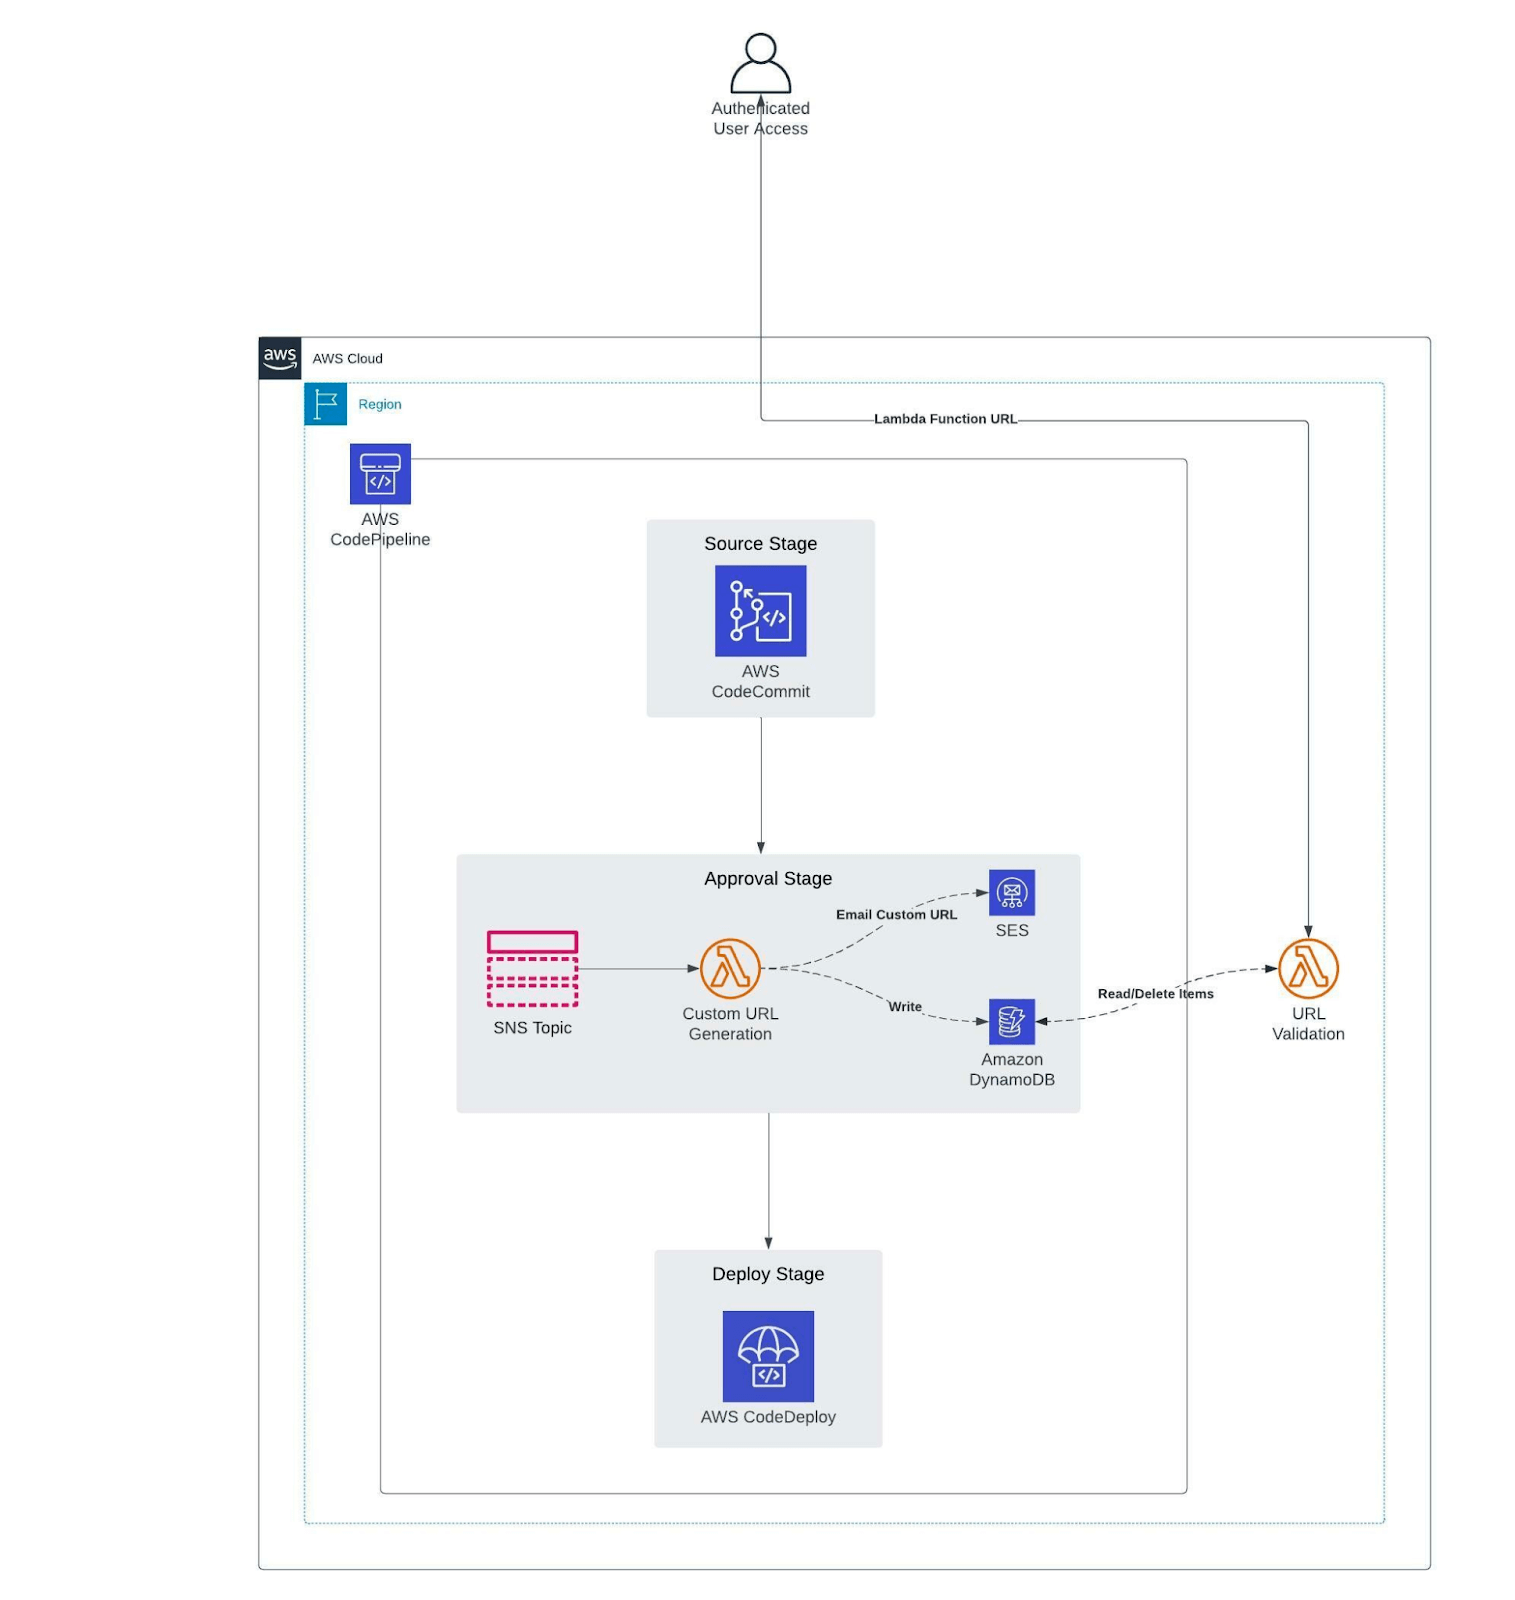
The above architecture diagram depicts a simple AWS CodePipeline with multiple stages. AWS CodeCommit is used in the first stage, which is a source stage, to execute AWS CodePipeline whenever there is a commit to the source code repository.
The second stage would be a manual approval that initiates a Lambda function(Custom URL Generator) using an SNS Topic. This Lambda function (Custom URL Generator) creates custom codes for accept and reject, which are then attached as parameters to the Lambda function URL of the Lambda function (URL Validation) to build custom URLs. Custom URLs are sent to authorised users through email using SES, and the resulting custom code is stored in a DynamoDB table.
Last but not least, when an authorised user clicks on the accept or reject URL in the email, a URL Validation Lambda function is triggered to validate the custom code stored in DynamoDB and take appropriate action. Additionally, when a user clicks on a custom-generated URL, the URL Validation Lambda function validates it for a 1-hour expiry.
Walkthrough
Now that we have an overview of the solution, let’s dive deep and walk you through the following steps in detail.
- Creating AWS Lambda function (URL Validation) with functional URL
- Creating AWS SNS Topic
- Setting up AWS SES with email identity
- Creating and configure an AWS DynamoDB table
- Creating another AWS Lambda function (Custom URL Generator)
- Creating new IAM Policies and adding it to the respective AWS Lambda function
Creating AWS Lambda function (URL Validation) with function URL
Follow the below steps to create a Lambda function with function URL and python 3.9 as runtime.
- Open the Functions page of the Lambda console.
- Choose Create function.
- Under Basic information, do the following:
- For Function name, enter a name for your function, such as url-validation.
- For Runtime, choose the language runtime as Python 3.9.
- For Architecture, choose x86_64.
- Expand Permissions, then create a new execution role with basic Lambda permissions.
- Expand Advanced settings, and then select Function URL.
- For Auth type, choose NONE.
- Choose Create function.
Add the below code snippet in lambda_function.py and Deploy the code.
import json
import boto3
import secrets
import os
from datetime import datetime

def lambda_handler(event, context):

    function_url = os.environ.get('FunctionalURL')
    to_email = os.environ.get('ToEmail')
    from_email = os.environ.get('FromEmail')
    codepipeline_message = json.loads(event['Records'][0]['Sns']['Message'])

    codepipeline = boto3.client('codepipeline')
    pipelinename = codepipeline_message['approval']['pipelineName']


    accept_code = secrets.token_urlsafe()
    reject_code = secrets.token_urlsafe()

    client = boto3.client('ses')
    dynamodb = boto3.client('dynamodb')

    ses_message = "Hello, <br><br> The following Approval action is waiting for your response: <br><br> --Pipeline Details-- <br> Pipeline name: %s <br> Stage name: %s <br> Action name: %s <br> Region: %s <br><br> --Approval Details-- <br> Accept : %s?value=accept&message=%s <br> Reject : %s?value=reject&message=%s" % (codepipeline_message['approval']['pipelineName'],codepipeline_message['approval']['stageName'],codepipeline_message['approval']['actionName'],codepipeline_message['region'],function_url,accept_code,function_url,reject_code)

    accept_response = client.send_email(
        Source=from_email,
        Destination={
            'ToAddresses': [
                to_email,
            ]
        },
        Message={
            'Subject': {
                'Data': 'APPROVAL NEEDED: AWS CodePipeline %s for action Approval' %(codepipeline_message['approval']['pipelineName'])
            },
            'Body': {
                'Text': {
                    'Data': ses_message
                },
                'Html': {
                    'Data': ses_message
                }
            }
        }
    )
    current_timestamp = datetime.now()
    current_timestamp = current_timestamp.strftime("%d/%m/%Y %H:%M:%S")

    data = dynamodb.put_item(
        TableName='POC',
        Item={
            'message_id': {
                'S' : event['Records'][0]['Sns']['MessageId']
            },
            'timestamp': {
                'S' : current_timestamp
            },
            'Accept_URL': {
                'S' : accept_code
            },
            'Reject_URL': {
                'S' : reject_code
            },
            'Pipeline_name': {
                'S' : codepipeline_message['approval']['pipelineName']
            },
            'Pipeline_stage': {
                'S' : codepipeline_message['approval']['stageName']
            },
            'Pipeline_action': {
                'S' : codepipeline_message['approval']['actionName']
            },
            'Pipeline_token': {
                'S' : codepipeline_message['approval']['token']
            }
        }
    )

    return {
        'statusCode': 200,
        'body': 'Email Sent Successfully'
    }
Copy the function url of the AWS Lambda function and save it.
Creating AWS SNS Topic
- Sign in to the Amazon SNS console.
- On the Topics page, choose Create topic.
- On the Create topic page, in the Details section, do the following:
- For Type, choose a topic type (Standard).
- Enter a Name for the topic such as Pipeline-Approval.
- (Optional) Enter a Display name for the topic.
- Choose Create topic. The topic is created and the Pipeline-Approval page is displayed.
The topic's Name, ARN, (optional) Display name, and Topic owner's AWS account ID are displayed in the Details section.
Setup AWS SES with email identity
To create an email address identity
- Open the Amazon SES console at https://console.aws.amazon.com/ses/.
- In the navigation pane, under Configuration, choose Verified identities.
- Choose Create identity.
- Under Identity details, choose Email address as the identity type you want to create.
- For Email address, enter the email address that you want to use. The email address must be an address that’s able to receive mail and that you have access to.
- (Optional) Add one or more Tags to your domain identity by including a tag key and an optional value for the key:
- Choose Add new tag and enter the Key. You can optionally add a Value for the tag.
- Repeat for additional tags not to exceed 50, or choose Remove to remove tags.
- To create your email address identity, choose Create identity. After it's created, you should receive a verification email within five minutes. The next step is to verify your email address by following the verification procedure in the next section.
To verify an email address identity
- Check the inbox of the email address used to create your identity and look for an email from no-reply-aws@amazon.com.
- Open the email and click the link to complete the verification process for the email address. After it's complete, the Identity status updates to Verified.
Creating and configure an AWS DynamoDB table
Creating a DynamoDB table with name “POC”
- Open the DynamoDB console at https://console.aws.amazon.com/dynamodb/.
- In the navigation pane on the left side of the console, choose Dashboard.
- On the right side of the console, choose Create Table.
- Enter the table details as follows:
- For the table name, enter POC.
- For the partition key, enter message_id.
- Add no sort key.
- Leave Default settings selected.
- Choose Create to create the table.
Write Data to a Table
- Open the DynamoDB console at https://console.aws.amazon.com/dynamodb/.
- In the navigation pane on the left side of the console, choose Tables.
- In the table list, choose the POC table.
- Select View Items.
- In the Items view, choose Create item.
- Choose Add new attribute, and then choose String. Name the field timestamp.
- Repeat this process by adding the below attributes and provide some dummy values.
- Choose Create item.
| Attribute Name | Data Type |
|---|---|
| timestamp | String |
| Accept_URL | String |
| Reject_URL | String |
| Pipeline_name | String |
| Pipeline_stage | String |
| Pipeline_action | String |
| Pipeline_token | String |
Creating another AWS Lambda function (Custom URL Generator)
Creating an AWS Lambda function for custom url generator
- Open the Functions page of the Lambda console.
- Choose Create function.
- Under Basic information, do the following:
- For Function name, enter a name for your function, such as custom-url-generator.
- For Runtime, choose the language runtime as Python 3.9.
- For Architecture, choose x86_64.
- Expand Permissions, then create a new execution role with basic Lambda permissions.
- Choose Create function.
Add the below code snippet in lambda_function.py and Deploy the code.
import json
import boto3
from datetime import datetime
from datetime import timedelta

def lambda_handler(event, context):

    out_message = 'Invalid URL'

    dynamodb = boto3.client('dynamodb')
    pipeline = boto3.client('codepipeline')
    decision = event['queryStringParameters']['value']
    code = event['queryStringParameters']['message']
    current_time = datetime.now()
    current_time = current_time.strftime("%d/%m/%Y %H:%M:%S")
    current_time = datetime.strptime(current_time, "%d/%m/%Y %H:%M:%S")

    db_response = dynamodb.scan(
        TableName='POC'
    )

    print(db_response['Items'][0]['Accept_URL'])
    if decision == 'accept':
        x = 0
        no_of_items = len(db_response['Items'])
        while x < no_of_items:
            if db_response['Items'][x]['Accept_URL']['S'] == code:
                messageid = db_response['Items'][x]['message_id']['S']
                pipelinename = db_response['Items'][x]['Pipeline_name']['S']
                pipelinestagename = db_response['Items'][x]['Pipeline_stage']['S']
                pipelineaction = db_response['Items'][x]['Pipeline_action']['S']
                pipelinetoken = db_response['Items'][x]['Pipeline_token']['S']
                timestamp_old = db_response['Items'][x]['timestamp']['S']
                timestamp_old = datetime.strptime(timestamp_old, '%d/%m/%Y %H:%M:%S')
                expireson = timestamp_old + timedelta(hours=1)
                if current_time < expireson:
                    cp_response = pipeline.put_approval_result(
                       pipelineName=pipelinename,
                        stageName=pipelinestagename,
                        actionName=pipelineaction,
                        result={
                            'summary': 'CodePipeline requestion has been approved',
                            'status': 'Approved'
                        },
                    token=pipelinetoken
                    )
                    out_message = 'CodePipeline Approved'
                    dynamodb_delete_response = dynamodb.delete_item(
                        TableName='POC',
                        Key={
                            'message_id' : {
                                'S' : messageid
                            }
                        }
                    )
                    break
                elif current_time > expireson:
                    dynamodb_delete_response = dynamodb.delete_item(
                        TableName='POC',
                        Key={
                            'message_id' : {
                                'S' : messageid
                            }
                        }
                    )
                    cp_response = pipeline.put_approval_result(
                        pipelineName=pipelinename,
                        stageName=pipelinestagename,
                        actionName=pipelineaction,
                        result={
                            'summary': 'CodePipeline request has been rejected due to expiration',
                            'status': 'Rejected'
                        },
                    token=pipelinetoken
                    )
                    out_message = 'URL Expired'
            x = x + 1


    elif decision == 'reject':
        x = 0
        no_of_items = len(db_response['Items'])
        while x < no_of_items:
            if db_response['Items'][x]['Reject_URL']['S'] == code:
                messageid = db_response['Items'][x]['message_id']['S']
                pipelinename = db_response['Items'][x]['Pipeline_name']['S']
                pipelinestagename = db_response['Items'][x]['Pipeline_stage']['S']
                pipelineaction = db_response['Items'][x]['Pipeline_action']['S']
                pipelinetoken = db_response['Items'][x]['Pipeline_token']['S']
                timestamp_old = db_response['Items'][x]['timestamp']['S']
                timestamp_old = datetime.strptime(timestamp_old, '%d/%m/%Y %H:%M:%S')
                expireson = timestamp_old + timedelta(hours=1)
                if current_time < expireson:
                    cp_response = pipeline.put_approval_result(
                        pipelineName=pipelinename,
                        stageName=pipelinestagename,
                        actionName=pipelineaction,
                        result={
                            'summary': 'CodePipeline request has been rejected',
                            'status': 'Rejected'
                        },
                    token=pipelinetoken
                    )
                    out_message = 'CodePipeline Rejected'
                    dynamodb_delete_response = dynamodb.delete_item(
                        TableName='POC',
                        Key={
                            'message_id' : {
                                'S' : messageid
                            }
                        }
                    )
                    break
                elif current_time > expireson:
                    dynamodb_delete_response = dynamodb.delete_item(
                        TableName='POC',
                        Key={
                            'message_id' : {
                                'S' : messageid
                            }
                        }
                    )
                    cp_response = pipeline.put_approval_result(
                        pipelineName=pipelinename,
                        stageName=pipelinestagename,
                        actionName=pipelineaction,
                        result={
                            'summary': 'CodePipeline request has been rejected due to expiration',
                            'status': 'Rejected'
                        },
                    token=pipelinetoken
                    )
                    out_message = 'URL Expired'
            x = x + 1
    else:
        out_message = "Invalid URL"

    return {
        'statusCode': 200,
        'body': out_message
Add an environmental variables to AWS Lambda function for custom URL generator
- Open the Functions page of the Lambda console.
- Choose the function custom-url-generator.
- Choose Configuration, then choose Environment variables.
- Under Environment variables, choose Edit.
- Choose Add environment variable.
- Enter the key and value as shown in the table.
- Choose Save.
| Key | Value |
|---|---|
| FromEmail | [SES verified email] |
| ToEmail | [SES verified email] |
| FunctionalURL | [url-validation function url] |
Creating new IAM Policies and adding it to the respective AWS Lambda function
Creating IAM policy for AWS Lambda function (Custom URL Generator)
- Open the IAM console at https://console.aws.amazon.com/iam/.
- In the navigation pane on the left, choose Policies.
- Choose Create policy.
- Choose the JSON tab.
- Paste the below JSON policy.
{
    "Version": "2012-10-17",
    "Statement": [
        {
            "Sid": "VisualEditor0",
            "Effect": "Allow",
            "Action": "dynamodb:PutItem",
            "Resource": "arn:aws:dynamodb:<aws-region>:<aws-account-id>:table/<dynamodb-table-name>"
        },
        {
            "Sid": "VisualEditor1",
            "Effect": "Allow",
            "Action": "ses:SendEmail",
            "Resource": "*"
        }
    ]
}
Note: Replace <aws-region> , <aws-account-id> and <dynamodb-table-name> with appropriate values.
- Choose Review policy.
- When you are finished, choose Next: Tags.
(Optional) Add metadata to the policy by attaching tags as key-value pairs. - On the Review policy page, type a Name as custom-url-generator-policy and a Description (optional) for the policy that you are creating. Review the policy Summary to see the permissions that are granted by your policy. Then choose Create policy to save your work.
Attach IAM Policy to Lambda function (Custom URL Generator) execution role
- Open the Functions page of the Lambda console.
- Choose custom-url-generator function.
- Choose Configuration and then choose Permissions.
- Click on Role name.
- A new windows opens with IAM role summary. Click on Add Permissions and select Attach policies.
- Search for custom-url-generator-policy in the search box.
- Select the policy and click Attach policies.
Creating IAM policy for AWS Lambda function (URL Validation)
- Open the IAM console at https://console.aws.amazon.com/iam/.
- In the navigation pane on the left, choose Policies.
- Choose Create policy.
- Choose the JSON tab.
- Paste the below JSON policy.
"Version": "2012-10-17",
    "Statement": [
        {
            "Sid": "VisualEditor0",
            "Effect": "Allow",
            "Action": [
                "codepipeline:PutApprovalResult",
                "dynamodb:DeleteItem",
                "dynamodb:Scan"
            ],
            "Resource": [
                "arn:aws:codepipeline:<aws-region>:<aws-account-id>:<pipeline-name>/<pipeline-stage-name>/<pipeline-action-name>",
                "arn:aws:dynamodb:<aws-region>:<aws-account-id>:table/<dynamodb-table-name>"
            ]
        }
    ]
}
Note: Replace <aws-region> , <aws-account-id> , <pipeline-name>, <pipeline-stage-name>, <pipeline-action-name> and <dynamodb-table-name> with appropriate values.
- Choose Review policy.
- When you are finished, choose Next: Tags.
(Optional) Add metadata to the policy by attaching tags as key-value pairs. - On the Review policy page, type a Name as url-validation-policy and a Description (optional) for the policy that you are creating. Review the policy Summary to see the permissions that are granted by your policy. Then choose Create policy to save your work.
Attach IAM Policy to Lambda function (URL Validation) execution role
- Open the Functions page of the Lambda console.
- Choose url-validation function.
- Choose Configuration and then choose Permissions.
- Click on Role name.
- A new windows opens with IAM role summary. Click on Add Permissions and select Attach policies.
- Search for url-validation-policy in the search box.
- Select the policy and click Attach policies.
Conclusion
At Nordcloud, we’re here to help. In this case, that means making it simple for managers and other team leads who are responsible for authorising deployments to approve modifications for production or other environments while away on business meetings or other engagements without AWS Login.
Get in Touch.
Let’s discuss how we can help with your cloud journey. Our experts are standing by to talk about your migration, modernisation, development and skills challenges.
