
Automating Cross-account CI/CD Pipelines Using AWS CDK v2
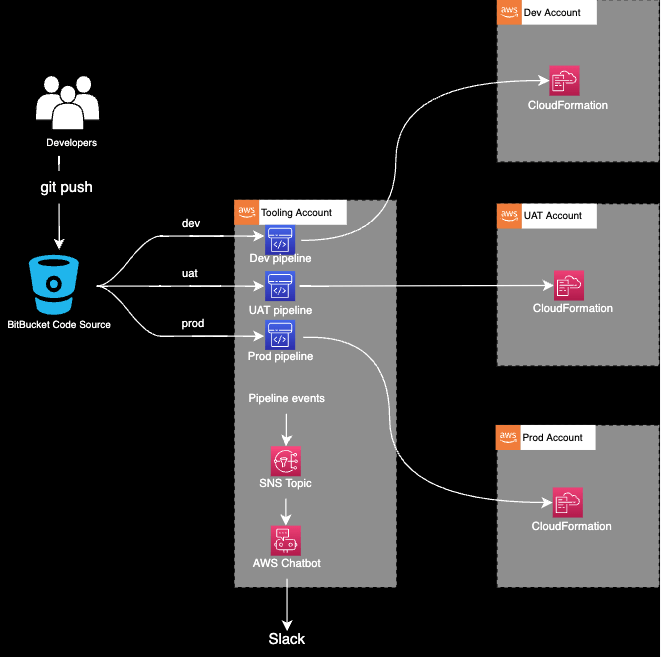
In today’s blog post, we will provision pipelines in a tooling account to deploy an application from a BitBucket repository into dev, UAT and production accounts via AWS CodePipeline.
The pipelines will be triggered when the code is merged to the relevant branch. On top of this, pipeline updates will be sent to Slack through AWS Chatbot integration.
Why should you consider a multi-account approach?
- Resource isolation
An AWS account provides the highest level of resource isolation. This means that you can create separate AWS accounts for each of your applications, workloads, and organisational units. And you can have processes, people or both to manage the lifecycle of resources for each account.
- Area of impact
You can reduce the potential impact area of a disaster (e.g. an AWS account gets suspended or a security breach occurs).
- Service quotas
For each AWS service, your account has default quotas — previously known as limits. Each quota is region-specific unless otherwise stated. Some quotas are subject to requests for increases, while others are not.
Q: What should I do if I require a quota that cannot be increased?
A: You should consider using multiple accounts.
- Workload visibility
In some circumstances, you might want to limit the workload’s visibility.
- Data isolation
You wish to isolate types of data into separate locations (e.g. you have an application on Account A and you ship all the logs to Account B where you aggregate, analyse and audit the log data.)
Prerequisites
- Minimum 2 AWS accounts (tooling account + one other).
- Set up .aws/credentials profiles for tooling, dev, UAT, and prod accounts so you can execute CLI and CDK commands against them.
- If you want to use an IAM role in the CLI or you want to enable MFA, check this link.
Setup
- Install and configure git
- Clone this repository
- npm install
- npm run build
Setting up the Pipelines
The pipeline stacks need to be deployed once manually. From that point, the pipelines will use the CloudFormation templates that have been generated by the CDK to deploy the application.
Bootstrapping
We can either bootstrap via CDK deploy, or via CloudFormation.
- Via CDK Deploy
Bootstrapping the Tooling Account

Bootstrapping a Target Account

- Via CloudFormation
Bootstrap all accounts using this AWS template. Make sure that your tooling account is included in the `TrustedAccounts` parameter.
Bitbucket
- Push the code into dev, uat and main branches.
- Create a Bitbucket — CodeStar connection
By creating a Bitbucket — CodeStar connection, you authorise AWS CodeStar on your workspace for the following:
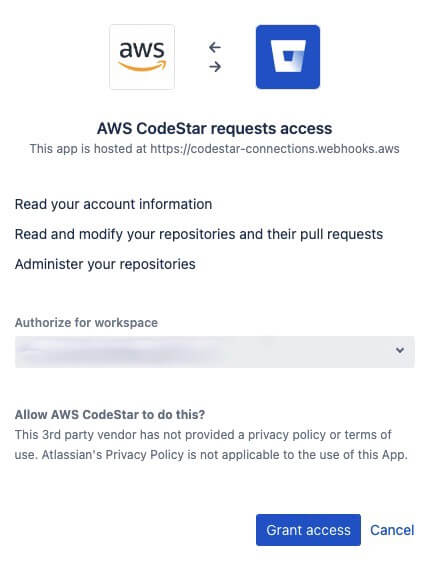
With AWS CodeStar, you can not target a specific repository on Bitbucket for this authorisation.
However, if you are integrating with Github you can target a specific repository as documented here.
Put the ARN that you got from the previous step into connectionArn in config.ts
Creating the Pipeline
CDK Pipelines can transparently deploy to other Regions and other accounts (provided those target environments have been bootstrapped).
However, in order to deploy to another account, you need to enable “crossAccountKeys: true” when creating the pipeline.
const pipeline = new CodePipeline(this, "MyPipeline", {
      pipelineName: `MyPipeline-${stageName}-${deploymentEnv.region}`,
      /**
       * CDK Pipelines can transparently deploy to other Regions and other accounts (provided those target environments have been bootstrapped).
       * However, in order to deploy to another account, you need to enable "crossAccountKeys: true" when creating the pipeline.
       * @see https://docs.aws.amazon.com/cdk/api/v2/docs/aws-cdk-lib.pipelines-readme.html#deploying-to-other-accounts--encrypting-the-artifact-bucket
       */
      crossAccountKeys: true,
      synth: new ShellStep("Synth", {
        input: CodePipelineSource.connection(repoString, branchName, {
          connectionArn,
        }),
        installCommands: ["n 14.19.0"],
        commands: ["npm ci", "npm run build", "npx cdk synth"],
      }),
      codeBuildDefaults: {
        buildEnvironment: {
          buildImage: LinuxArmBuildImage.AMAZON_LINUX_2_STANDARD_2_0,
        },
        partialBuildSpec: BuildSpec.fromObject({
          phases: {
            install: {
              commands: ["n 14.19.0"],
            },
          },
        }),
      },
    });

    const applicationStage = new AppStage(this, "DeployStage", {
      env: deploymentEnv,
      stageName,
      version,
    });

    const securityChangesTopic = new aws_sns.Topic(
      this,
      "SecurityChangesTopic",
      {
        displayName: "SecurityChangesTopic",
      }
    );

    /**
     * This step would pause the pipeline if a deployment would add IAM permissions or Security Group rules
     * @see https://docs.aws.amazon.com/cdk/api/v2/docs/aws-cdk-lib.pipelines-readme.html#confirm-permissions-broadening
     */
    const securityCheckStep = new ConfirmPermissionsBroadening(
      "SecurityCheck",
      {
        stage: applicationStage,
        notificationTopic: securityChangesTopic,
      }
    );
    const additionalSteps: Array<Step> = [securityCheckStep];

    if (isPreApprovalNeeded) {
      /**
       * The Pipeline will be paused waiting for a human to resume it
       */
      const manualApprovalStep = new ManualApprovalStep("PreApproval", {
        comment: "Please review the changes to continue...",
      });

      additionalSteps.push(manualApprovalStep);
    }

    pipeline.addStage(applicationStage, {
      pre: additionalSteps,
    });
It is worth mentioning that ConfirmPermissionsBroadening step is a predefined step which is designed to pause the pipeline if a deployment would add IAM permissions or Security Group rules. You can read more about it here.
Slack — AWS Chatbot Integration
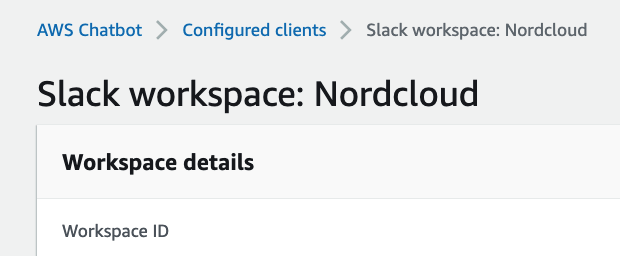
Creating a Slack Client
- Open the AWS Chatbot console at https://console.aws.amazon.com/chatbot/
- Under Configure a chat client, choose Slack, then choose Configure client
- From the dropdown list at the top right, choose the Slack workspace that you want to use with AWS Chatbot
- Choose Allow
We just created our Slack client!
Now what we need to do is fill up the slackWorkspaceId in our config.ts with the Workspace ID that we see under the Workspace details.
Now we need the channel ID of the Slack channel that we want to integrate into.
To get the Slack channel ID in a simple way:
- Open the Slack webpage of your team and then open the channel. The channel id will be part of the URL.
- If it is the desktop app, right click on the channel > Copy > Copy link

- Put this value into slackChannelId in config.ts.
- Then, fill up slackChannelConfigurationName in config.ts with a unique name. Remember, the name must be unique across your account and can’t be edited later.
Let’s add AWS Chatbot to our Slack workspace.
- In Slack, on the left navigation pane, choose Apps. (If you do not see Apps in the left navigation pane, choose More, then choose Apps.)
- If AWS Chatbot is not listed, choose the Browse Apps Directory button.
- Browse the directory for the AWS Chatbot app and then choose Add to add AWS Chatbot to your workspace.
- Finally, go to the Slack channel and invite AWS Chatbot via running the following Slack command: /invite @aws
We are all set, now we can configure our channel!
    const slack = new aws_chatbot.SlackChannelConfiguration(
      this,
      "aws-cicd-demo",
      {
        slackChannelConfigurationName,
        slackWorkspaceId,
        slackChannelId,
      }
    );
We now choose which pipeline events we wish to notify our Slack channel for. Check out all potential events right here.
    const pipelineUpdatesTopic = new aws_sns.Topic(
      this,
      "PipelineUpdatesTopic"
    );

    /**
     * We must build the pipeline before creating the notification rule
     */
    pipeline.buildPipeline();

    const rule = new aws_codestarnotifications.NotificationRule(
      this,
      "PipelineNotificationRule",
      {
        source: pipeline.pipeline,
        events: [
          "codepipeline-pipeline-manual-approval-needed",
          "codepipeline-pipeline-manual-approval-failed",
          "codepipeline-pipeline-manual-approval-succeeded",
          "codepipeline-pipeline-pipeline-execution-failed",
          "codepipeline-pipeline-pipeline-execution-canceled",
          "codepipeline-pipeline-pipeline-execution-started",
          "codepipeline-pipeline-pipeline-execution-resumed",
          "codepipeline-pipeline-pipeline-execution-succeeded",
          "codepipeline-pipeline-pipeline-execution-superseded",
        ],
        targets: [pipelineUpdatesTopic],
      }
    );
    rule.addTarget(slack);
A note on pipeline — Slack integration: The NotificationRule can only be created after the pipeline has been built. And after the pipeline has been built, no modifications can be made on the pipeline.
Additionally, we created an SNS topic to achieve this. You can easily connect another subscriber to this topic, for example, you can subscribe to it just with an email as shown below.

Subscribing an email to the PipelineUpdatesTopic
App
The pipelines will deploy a simple REST API that is backed by a Lambda function.
Updating
The pipelines will be triggered whenever a new code is merged to the relevant branch.
The pipelines are self-mutating, which means that if you add new application stages in the source code, or new stacks to the application, the pipelines will automatically reconfigure themselves to deploy those new stages and stacks.
Last Steps
- Fill up the remaining variables in config.ts.
- Finally, run the below script to initiate the deployment: cdk deploy --verbose --all --profile ${TOOLING_PROFILE}
Security Considerations
aws-cdk-lib.pipelines module · AWS CDK
Security Considerations — docs.aws.amazon.com
Costs
A KMS key will be created in the tooling account for cross-account bucket encryption. It will cost around $1/month per pipeline.
The rest of the resources will be pay per use and will be well within the free-tier.
Cleanup
- Run the below script to destroy the pipeline stacks: cdk destroy --all --profile ${TOOLING_PROFILE}
- Delete the CloudFormation stacks manually from the target accounts.
- Delete the pipeline artifact buckets in the tooling account manually.
Known Issues
aws-cdk-lib.pipelines module · AWS CDK
Known Issues — docs.aws.amazon.com
References
aws-cdk-lib.pipelines module · AWS CDK
Language | Packagedocs.aws.amazon.com
Even though the demo in the below re:Invent video is over CDK v1, the talk still applies to CDK v2.
AWS re:Invent 2021 - Automating cross-account CI/CD pipelines [REPEAT]

Get in Touch.
Let’s discuss how we can help with your cloud journey. Our experts are standing by to talk about your migration, modernisation, development and skills challenges.
